/
Google uses the term 2-Step Verification instead of Multi-Factor Authentication
Stop account takeover
Stop ATO with stolen credential and compromised token detection.
Harden unmanaged identities
Harden access paths with visibility, detection, and guardrails.
Investigate browser-related incidents
Investigate and respond faster with unique browser telemetry.
Secure shadow SaaS
See and control shadow SaaS in the browser.
Secure AI
See and control AI apps in the browser.
Secure BYOD
Extend consistent browser-based protection to unmanaged devices.
Secure Chromebooks
Secure browser activity on Chromebooks without endpoint agents.
Investigate and stop data loss
Detect and prevent data loss across AI tools, apps, and sessions.
This guide was written with the assumption that you are using the built-in Google Directory in Workspace. If you are using a third party authentication service (e.g. Microsoft Azure, ADFS, Okta, etc.), this guide won't be suitable. Please let us know what your situation is so we can add specific guidance for other common configurations.
We typically recommend encouraging users to enable MFA before enforcing it. This helps teams gradually adopt MFA, and gives support teams more time to get used to supporting users.
However, Google Workspace allows you to configure very flexible enforcement timelines and "grace periods" for new users. What this means in practice is that for smaller teams — around 25 or less accounts — we recommend that you skip straight to enforcement. If you are a bigger team that is tech savvy and unlikely to resist MFA you might do this as well.
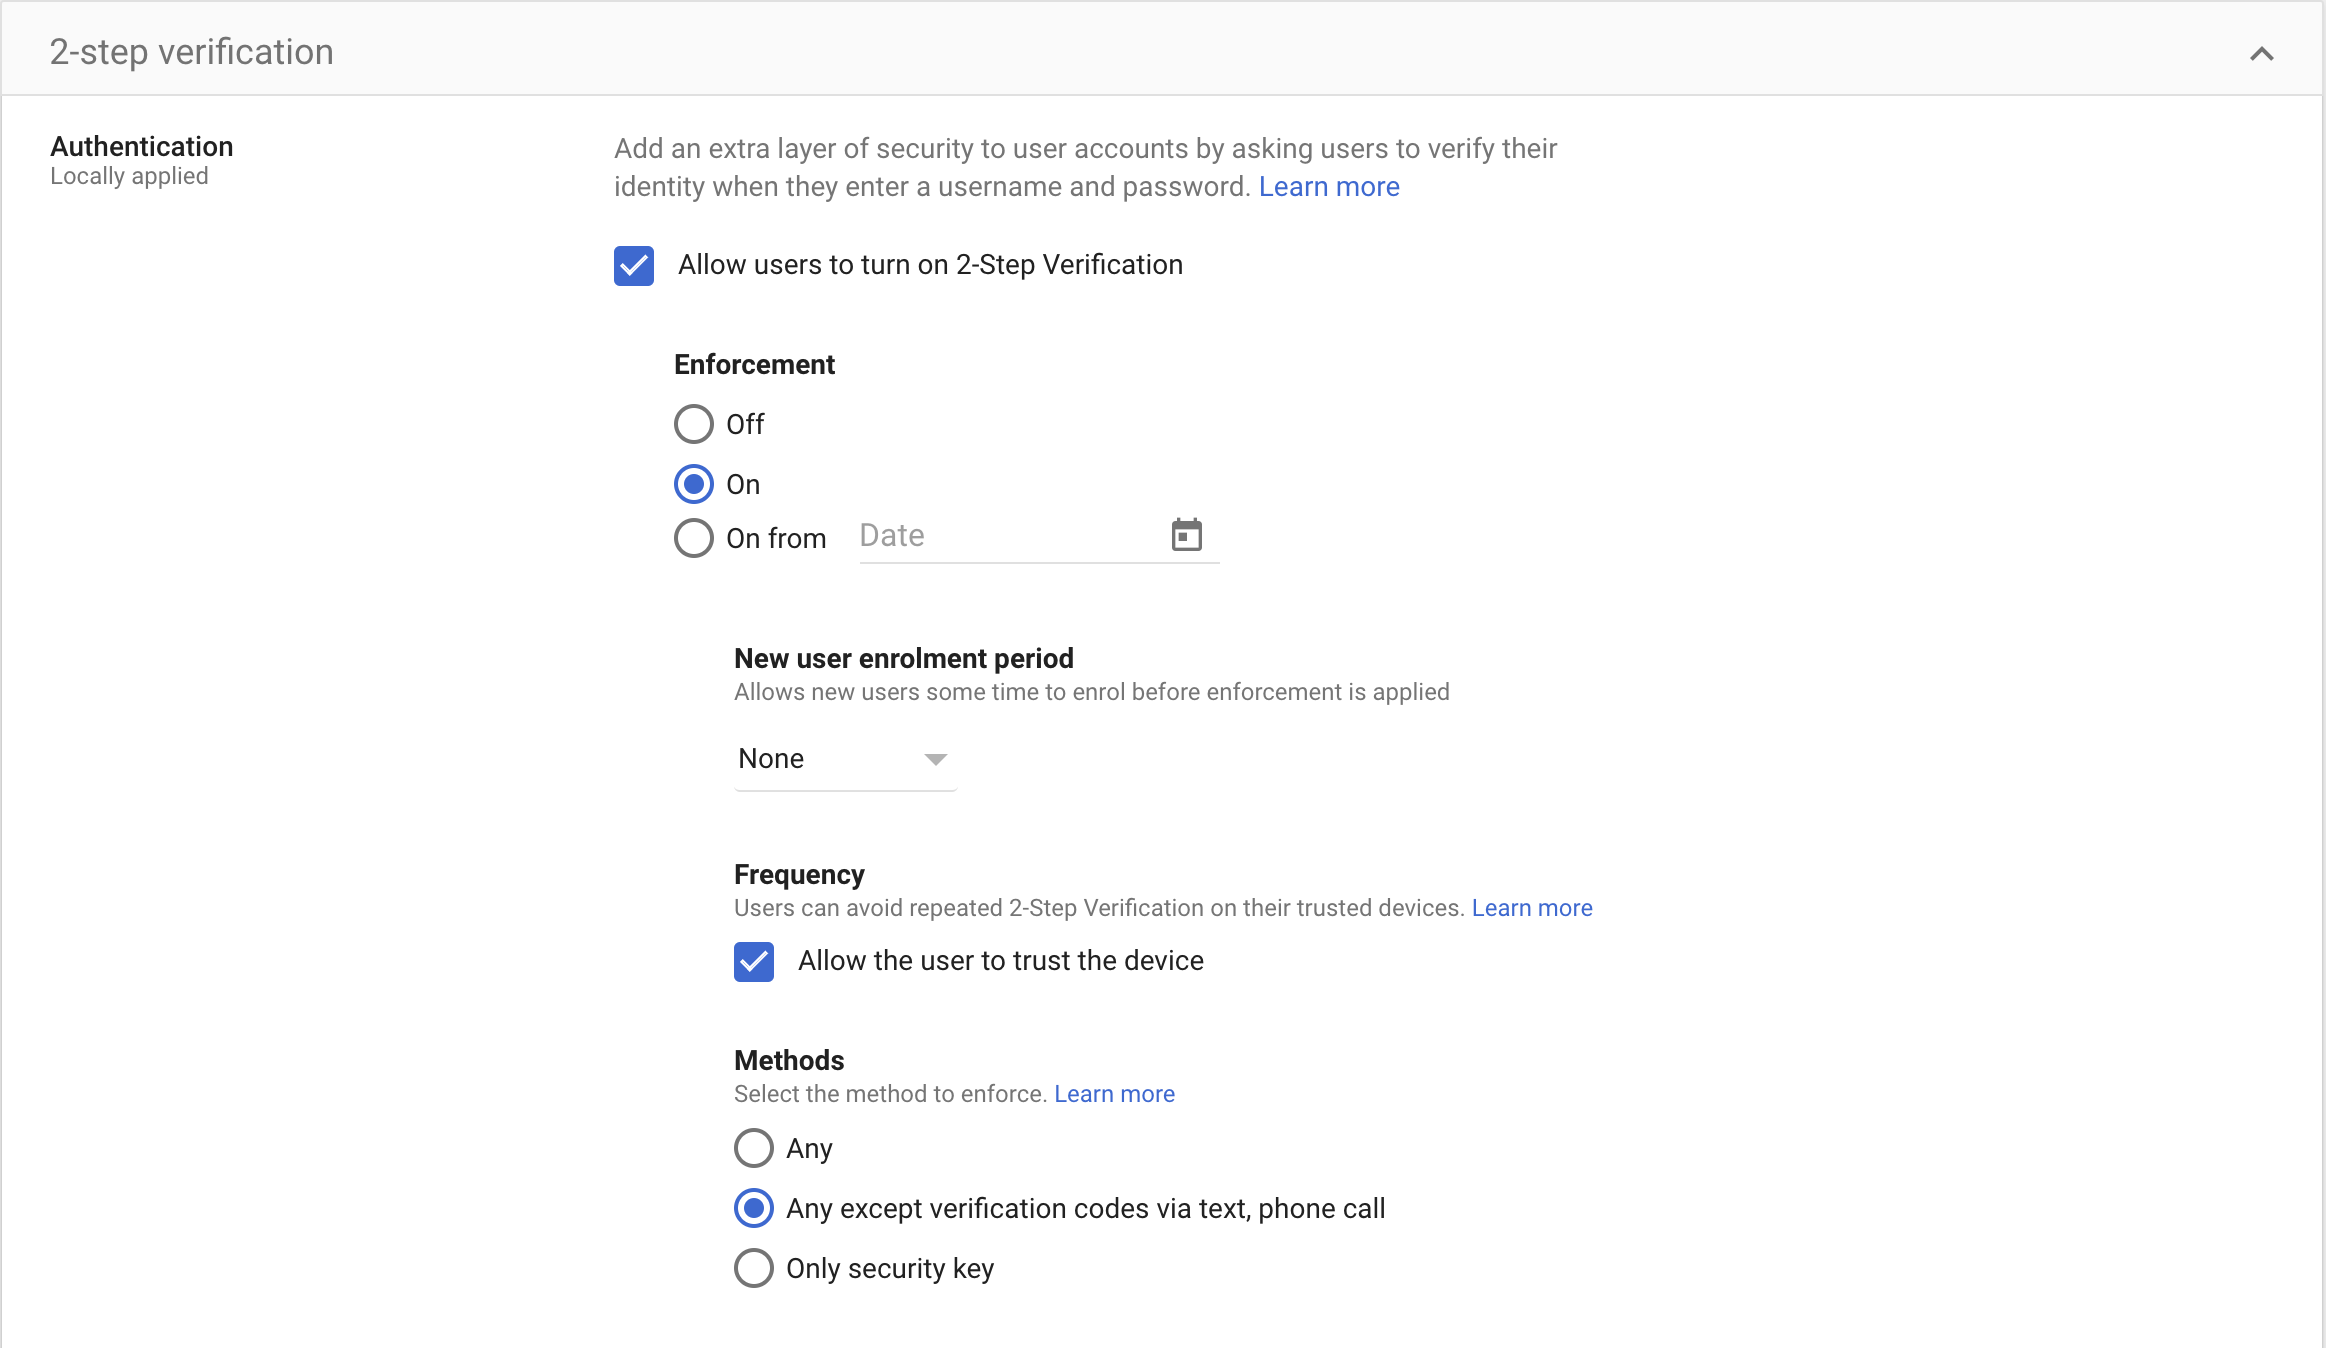
Google Workspace allows you to disable 2SV, enable 2SV (allowed to use, the default), and to enforce 2SV (must use) for all users, or a group of users.
When enforcing 2SV, the following options are available for MFA methods:
Security devices only (such as USB security dongles like Yubikeys or Titan security keys or modern Macbooks with fingerprint readers)
Any except verification codes via text, phone call
Anything (the default)
Unless you’re using security devices everywhere, we would normally recommend "Any except verification codes via text, phone call" — mainly because text and call based methods are less reliable (especially when travelling or where phone signal is spotty) and can lead to bad user experience.
Want to learn more about MFA methods and choosing the right option for you? Read more on our blog.
Unfortunately, the Google Workspace 2SV user setup wizard only allows users to register a phone number, a company phone, or a security key — authenticator apps are not an option.
If you are using company phones or security keys then there’s no issue, you can set the policy to “Any exception verification codes via text, phone call” or “Security devices only” and users can follow the setup wizard.
If you aren’t, users will have to register a phone number first (and you will have to permit that option) before they can then add an Authenticator app, if that is an option.
We think asking users to do this extra step is worth the increased reliability and improved experience. If this doesn’t make sense for your team, please let us know.
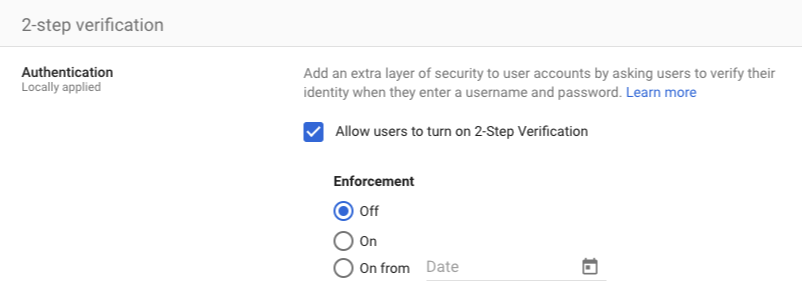
Navigate to the 2-Step Verification panel in the Google Workspace admin panel.
Ensure the tick box for "Allow users to turn on 2-Step Verification" is ticked (and remember to click save):
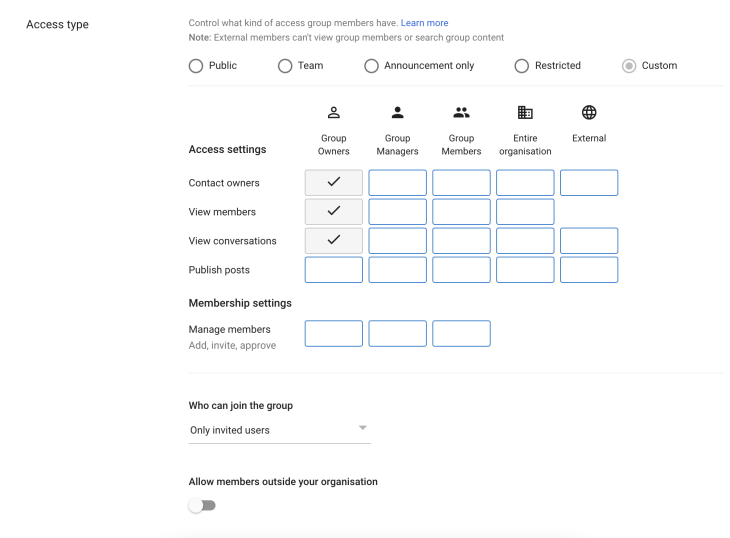
You could do this at the point when you have an emergency, but to avoid any delays it makes a lot of sense to create and test an MFA exception group beforehand to save time. Adding users to this group means that they are not required to use MFA — not something you should use in normal operation, but very useful in emergencies.
Login to the group management panel in the Google Workspace administration portal.
Create a new group.
Name the group "Emergency 2SV Disabled" or a similarly descriptive
Add a description to remember the purpose of this group, perhaps "Group to disable 2SV for specific users temporarily - group should normally be empty".
Set group email to something like "2sv-disabled"
Leave the owners empty
Set the group permissions as shown in the following screenshot:
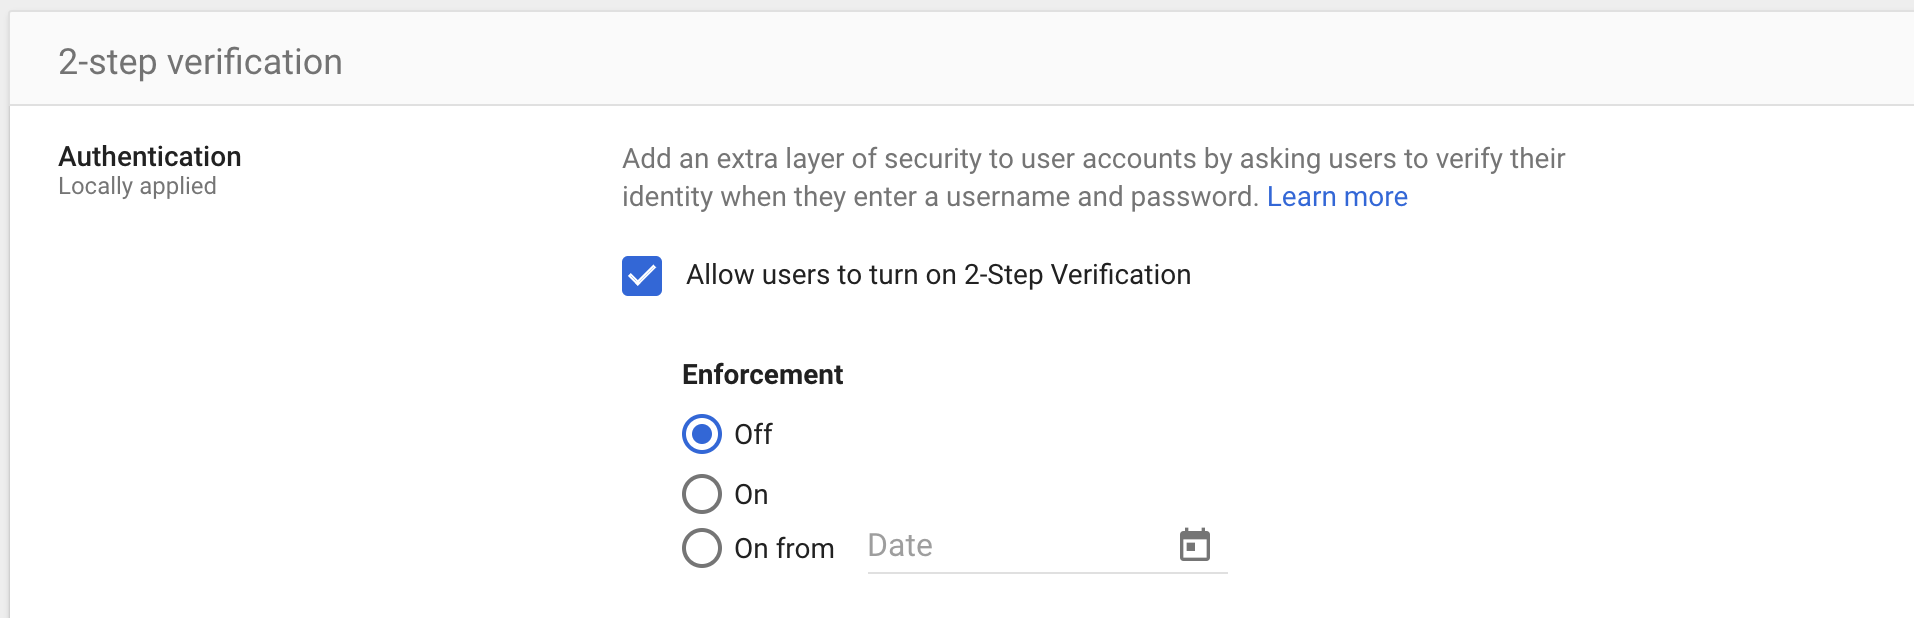
Configure 2SV settings for the group
Open the 2-Step Verification page
On the left hand pane, select the group you just created
Disable enforcement for the group as shown in this screenshot (and remember to click save):
Only Super Administrators can recover MFA for other Administrators. If you have a single Super Administrator in Google Workspace, it would make sense to create and print backup codes for that administrator in case they lose access to their MFA device. If you have more than one Super Administrator, one can reset the other's account and so this can be skipped (unless you want to be safe in cases where e.g. administrators are on leave). You always have the option to go through the Google account recovery process although this may be complicated and take a bit of time, and is definitely not ideal in an emergency.
Make sure you store the backup codes somewhere you would think of looking for them a year or two in the future — an "IT Recovery" folder in the office safe or locked filing cabinet makes sense for a lot of teams.
Before enforcing MFA, you should aim to get most users registered for MFA to avoid disruption but figuring out who needs to register and engaging with each of them is a hugely time-consuming process.
Use the Push platform to quickly see who hasn't registered for MFA yet and use ChatOps to engage with them automatically to get it done with ease.
When you are ready to do so, enabling MFA on Google Workspace by following the steps below:
Go to the 2-Step Verification page in the Google Admin dashboard.
Configure the details of your MFA deployment:
Under Enforcement, choose when you would like to start enforcing 2SV
Under Methods, choose the option appropriate for your team (Not sure? We recommend "Any except verification codes via text, phone call")
Hint: where available, and where they are the sole user of the device, you should "Allow the user to trust the device” so they only get prompted once a month or similar. Reducing the volume of MFA prompts will greatly reduce the chance of a user accepting prompts they didn't initiate.