
Ready to help
Managed deployment using Microsoft Group Policy
In this section:
Overview
Deploy the Push browser extension for Google Chrome, Microsoft Edge, or Firefox using Microsoft Group Policy.
Because the installation requires adding administrative template files to your Microsoft Active Directory and altering your Group Policy configuration, we recommend you implement the changes first in a test environment.
Note: If you are deploying the Push browser extension for more than one browser, review each section of this documentation to avoid missing settings that need to be applied in each instance.
Deploying to Google Chrome
Install the administrative templates
Google Chrome requires additional administrative templates be added to Active Directory to deploy configurations via group policy. The required files can be downloaded from the following link.

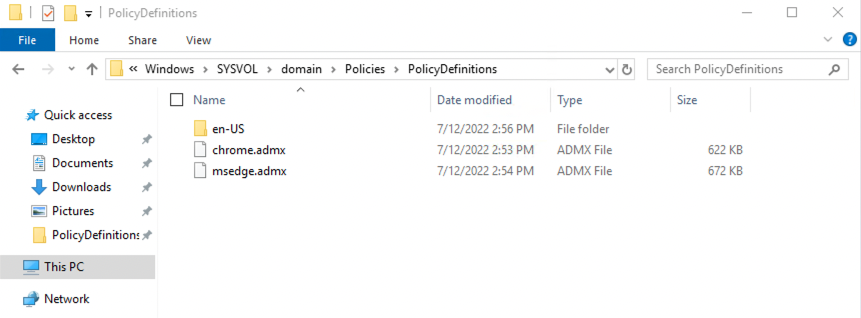
1. In the extracted policy files folder, locate the admx folder and copy chrome.admx to the following location:
%systemroot%\sysvol\domain\policies\PolicyDefinitions2. In the same extracted policy files location, open the language folder appropriate to your location (eg. en-US) and copy the chrome.adml file to the matching folder under PolicyDefinitions:
%systemroot%\sysvol\domain\policies\PolicyDefinitions\en-USYour folder structure should resemble the following:
You can confirm that the administrative templates have been installed correctly by opening Group Policy Management Editor and expanding Computer Configuration > Policies > Administrative Templates.
Note: If you prefer to deploy the extension to a subset of users, you can do so by configuring the policies under User Configuration > Policies > Administrative Templates instead.
3. You should be able to see nodes labeled Google Chrome:

Generate the extension config
Before configuring Group Policy, we need to generate a config file in the Push admin console. Skip to the next step if you've already done so.
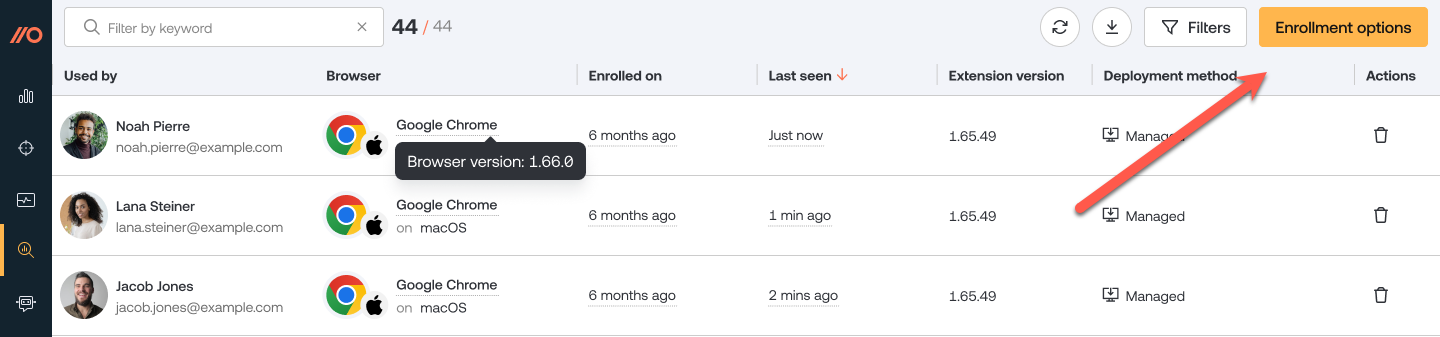
1. In the Push admin console, go to Browsers > Enrollment options.
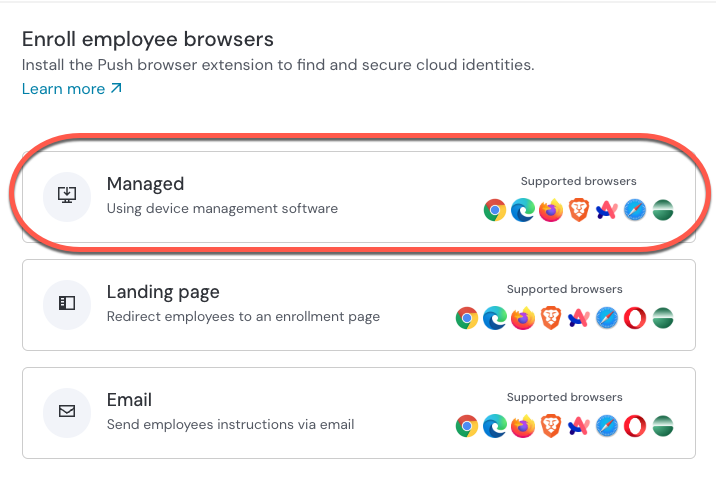
2. Then select a Managed enrollment.
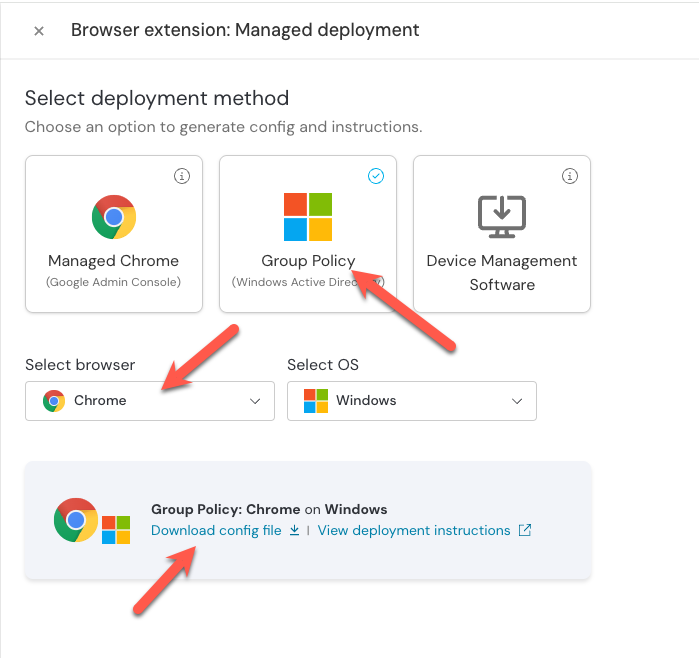
3. Select Group Policy and make sure that Chrome is the selected browser. Then click Generate config. This will allow you to download a config file specific to your team.
4. Download and extract the zip file.
Configure Group Policy to automatically deploy and configure the Push extension
In the Microsoft Group Policy Management Editor, go to your templates folder, then Google Chrome > Extensions > Configure the list of force-installed apps and extensions.
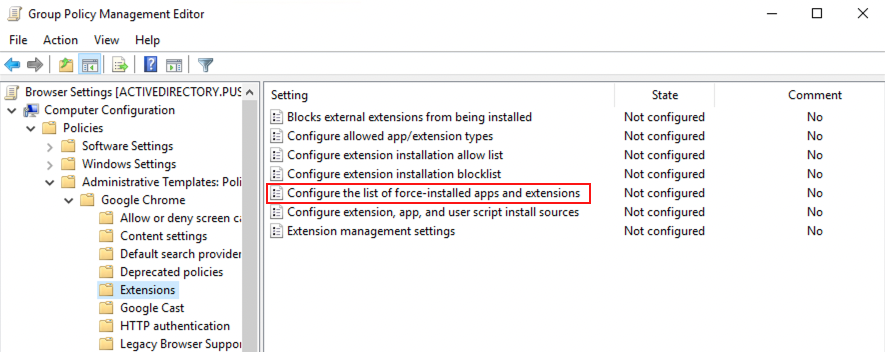
1. Open the configuration setting and set the policy to Enabled. This will allow you to click the Show ... button to access the extension ID value.
2. Paste the Push Security extension ID value into the Value field.
dljjddkmmcminffjbcmeccgfbjlhmhlm;https://clients2.google.com/service/update2/crx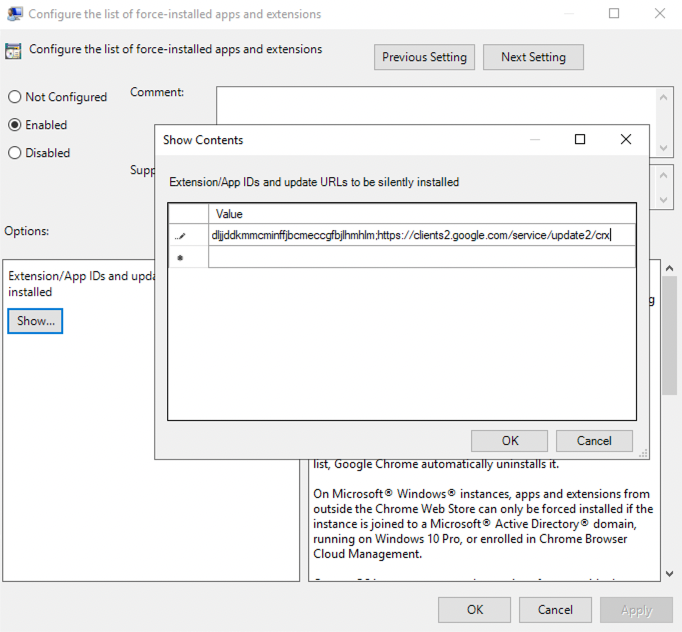
3. Then click OK and close the configuration item by clicking OK again. You should now see Enabled next to the setting of Configure the list of force-installed apps and extensions.
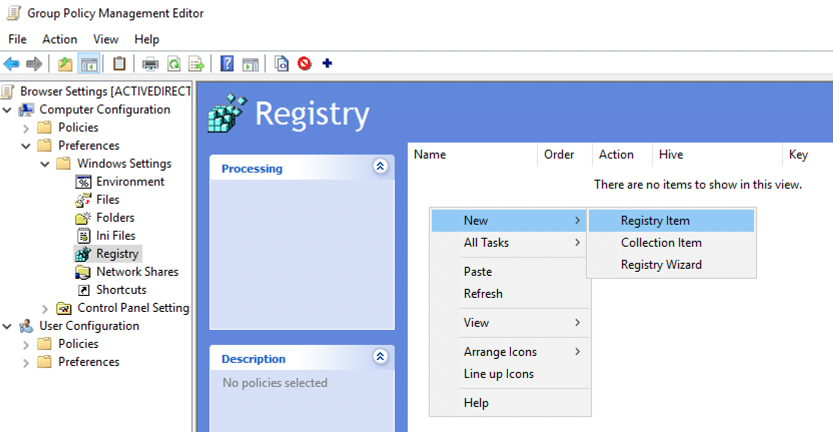
4. Next, under Computer Configuration, expand Preferences > Windows Settings and select Registry.
5. Right-click in the window pane on the right and select New > Registry Item.
6. Leave all the default options in place and paste the following into the Key Path field. Then click OK.
SOFTWARE\Policies\Google\Chrome\3rdparty\extensions\dljjddkmmcminffjbcmeccgfbjlhmhlm\policy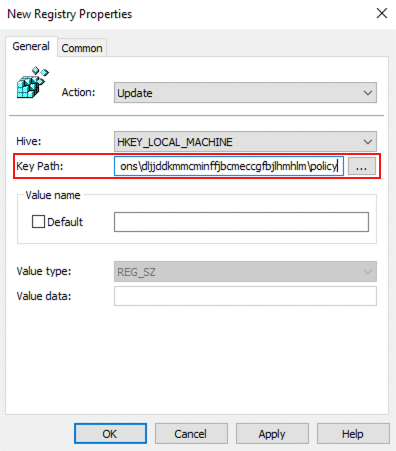
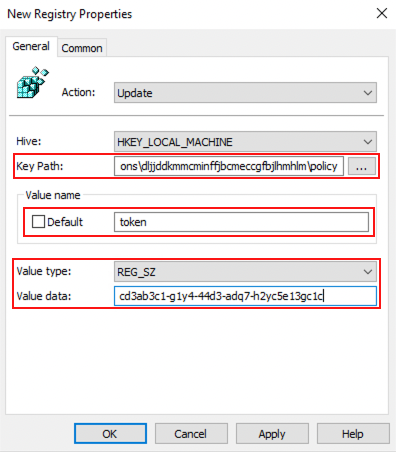
7. To create the next registry key, right click in the window pane again and select New > Registry Item. Leave all the default options in place, and paste the following into the Key Path field. Do not click OK yet.
SOFTWARE\Policies\Google\Chrome\3rdparty\extensions\dljjddkmmcminffjbcmeccgfbjlhmhlm\policy8. Next, enter the word token into the Value name field. Note: Extension policies are case-sensitive. Make sure that the value token is all lowercase.
9. Change the Value type to REG_SZ and set the Value data field to the value provided in the token.txt file generated in the Push app:
<YOUR_TOKEN_HERE>Finally, click OK.
10. Verify that the Group Policy Management Editor window looks like the image below, showing the two registry entries created in the previous steps:
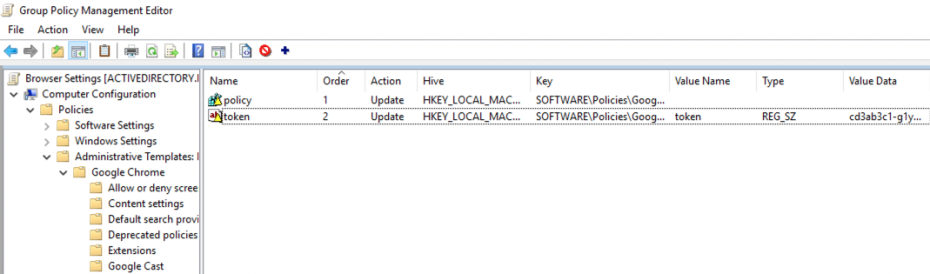
The registry keys should now start propagating to client machines affected by this group policy object.
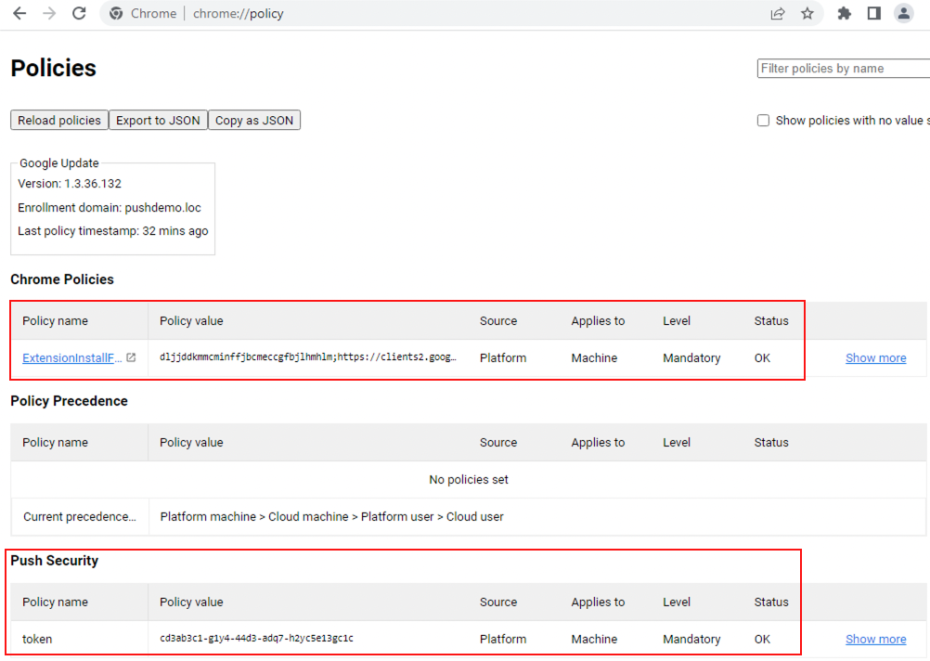
You can verify that the keys are recognized by Google Chrome by loading the chrome://policy page and clicking on the Reload Policies button.
Deploying to Microsoft Edge
Install the administrative templates
Microsoft Edge requires additional administrative templates to be added to Active Directory to deploy configurations via Group Policy.
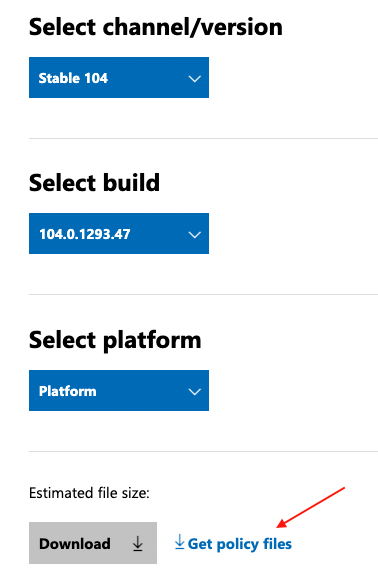
1. To begin, download the required files from Microsoft.
Select the current version, or select your channel/version, build, and platform for older versions of Edge.
2. Extract the policy files and locate the admx folder. Copy msedge.admx to the following location:
%systemroot%\sysvol\domain\policies\PolicyDefinitionsIn the same extracted policy files location, open the language folder appropriate for your location (e.g. en-US) and copy the msedge.adml file to the matching folder under PolicyDefinitions:
%systemroot%\sysvol\domain\policies\PolicyDefinitions\en-USYour folder structure should resemble the following:
3. Confirm that the administrative templates have been installed correctly by opening the Group Policy Management Editor and expanding Computer Configuration > Policies > Administrative Templates.
Note: If you prefer to deploy the extension to a subset of users, you can do so by configuring the policies under User Configuration > Policies > Administrative Templates instead.
You should be able to see nodes labeled Microsoft Edge:
Generate the extension config
Before configuring Group Policy, we need to generate a config file within the Push admin console. Skip to the next step if you've already done so.
1. In the Push admin console, go to the Browsers section, and click on Enrollment options.
2. On the modal, click Managed.
3. Then select Group Policy and make sure Edge is the selected browser. Then click Generate config. This will provide you with a button to download a config specific to your team.
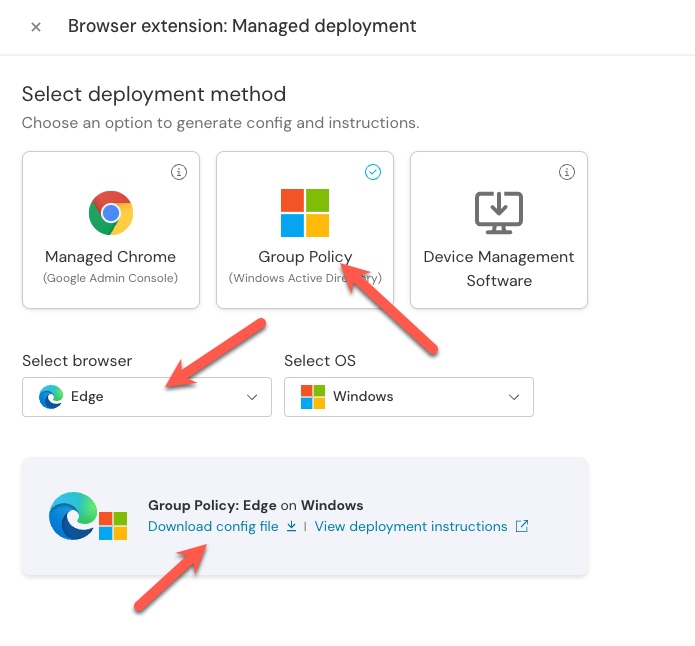
4. Download and unzip the config file.
Configure Group Policy to automatically deploy and configure the Push extension
In the Microsoft Group Policy Management Editor, go to your templates folder, then Microsoft Edge > Extensions > Control which extensions are installed silently.
1. Open the configuration setting and set the policy to Enabled. This will allow you to click the Show ... button to access the extension ID value.
2. Paste the Push Security extension ID value into the Value field. Then click OK and close the configuration item by clicking OK again. The Configure the list of force-installed apps and extensions setting should now show as enabled.
dljjddkmmcminffjbcmeccgfbjlhmhlm;https://clients2.google.com/service/update2/crx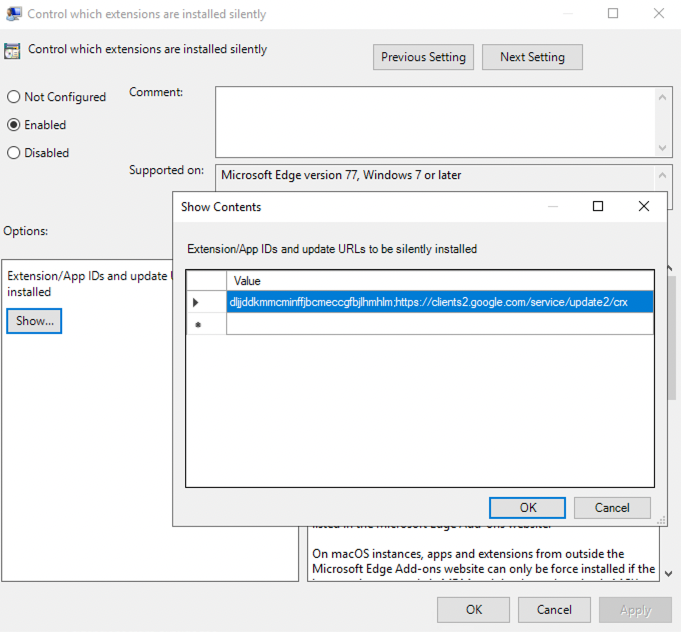
Note: The URL following the extension is one associated with Google Chrome. This is intentional and should be configured as described in order for the extension to successfully roll out to Microsoft Edge browsers.
3. Next under Computer Configuration, expand Preferences > Windows Settings and select the Registry entry.
Right-click on the window pane to the right and select New > Registry Item.
4. Leave the default options unchanged and paste the following registry key into the Key Path field. Then click OK.
Software\Policies\Microsoft\Edge\3rdparty\Extensions\dljjddkmmcminffjbcmeccgfbjlhmhlm\policy5. To create the next registry key, right-click in the window pane again and select New > Registry Item. Leave all the default options unchanged and paste the following registry key into the Key Path field. Do not click OK yet.
Software\Policies\Microsoft\Edge\3rdparty\Extensions\dljjddkmmcminffjbcmeccgfbjlhmhlm\policy6. Next, enter the word token into the Value name field. Note: Extension policies are case-sensitive. Make sure that the value token is all lowercase.
7. Change the Value type to REG_SZ and set the Value data field to the value provided in the token.txt file generated in the Push app:
<YOUR_TOKEN_HERE>Finally, click OK.
8. Verify that the Group Policy Management Editor window looks like the image below, showing the two registry entries created in the previous steps:
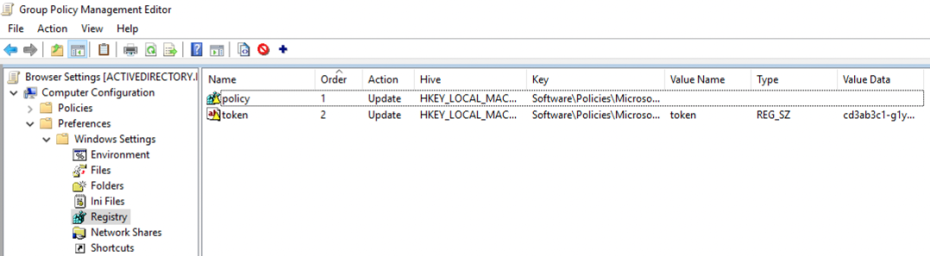
The registry keys should now start propagating to client machines affected by this group policy.
You can verify that the keys are created as intended by launching gpupdate.exe from a Run prompt. Then open regedit.exe and browse to the following location:
HKEY_LOCAL_MACHINE\Software\Policies\Microsoft\Edge\
3rdparty\Extensions\dljjddkmmcminffjbcmeccgfbjlhmhlm\policy
If the configured registry settings were applied successfully, the policy and token registry items configured in the previous steps will be visible.
Deploying to Firefox
Install the administrative templates
Firefox requires additional administrative templates to be added to Active Directory to deploy configurations via Group Policy. Note that this guide also applies to Firefox ESR.
1. To begin, download the required files from Mozilla.
Download the policy_templates_vX.YY.zip file associated with the latest release.
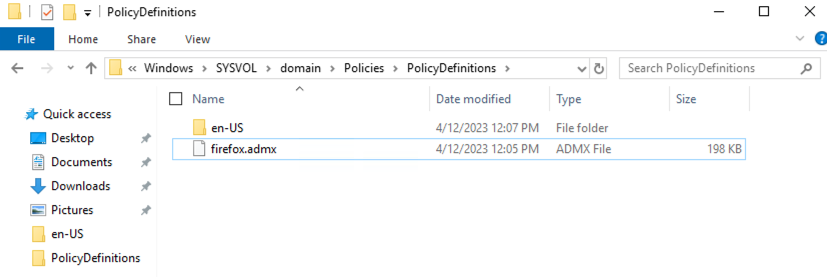
2. Extract the policy files and locate the windows folder. Copy firefox.admx to the following location:
%systemroot%\sysvol\domain\policies\PolicyDefinitionsIn the same extracted policy files location, open the language folder appropriate for your location (e.g. en-US) and copy the firefox.adml file to the matching folder under PolicyDefinitions:
%systemroot%\sysvol\domain\policies\PolicyDefinitions\en-USYour folder structure should resemble the following:
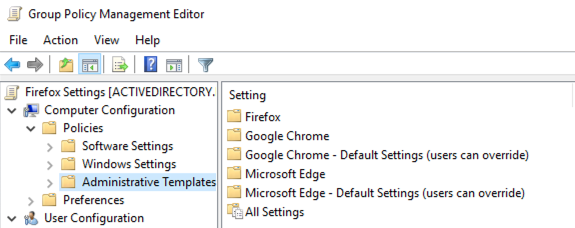
3. Confirm that the administrative templates have been installed correctly by opening the Group Policy Management Editor and expanding Computer Configuration > Policies > Administrative Templates.
Note: If you prefer to deploy the extension to a subset of users, you can do so by configuring the policies under User Configuration > Policies > Administrative Templates instead.
You should be able to see a node labeled Firefox:
Generate the extension config
Before configuring Group Policy, we need to generate a config file within the Push admin console. Skip to the next step if you've already done so.
1. In the Push admin console, go to the Browsers section, and click on Enrollment options.
2. On the modal, click Managed.
3. Then select Group Policy and make sure Firefox is the selected browser. Then click Generate config. This will provide you with a button to download a config specific to your team.
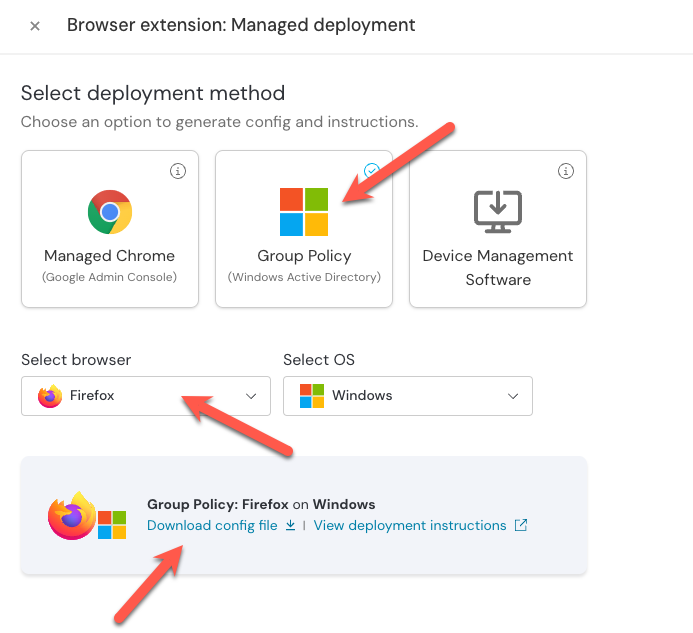
4. Download and unzip the config file.
Configure Group Policy to automatically deploy and configure the Push extension
In the Microsoft Group Policy Management Editor, go to your Administrative Templates folder, then Firefox > Extensions > Extensions to Install.
1. Open the configuration setting and set the policy to Enabled. This will allow you to click the Show ... button to access the extension value.
2. Paste the Push Security extension value into the Value field. Then click OK and close the configuration item by clicking OK again. The Extensions to Install setting should now show as enabled.
https://addons.mozilla.org/firefox/downloads/latest/push-security/latest.xpi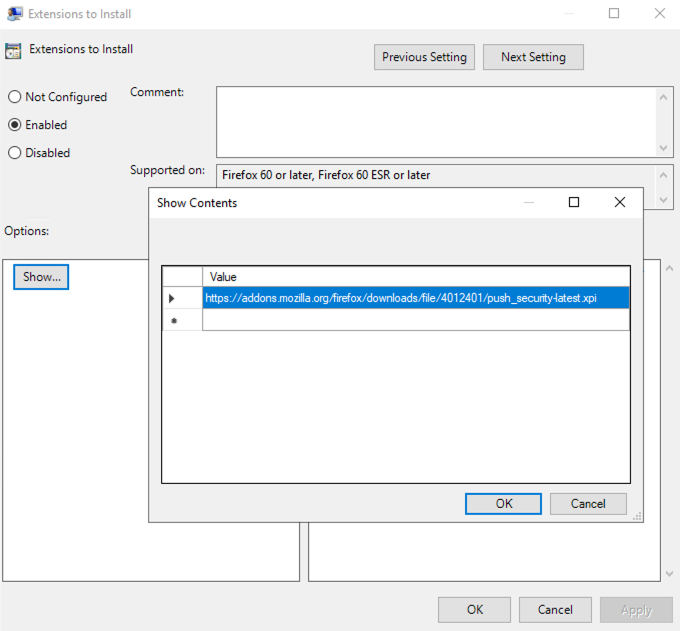
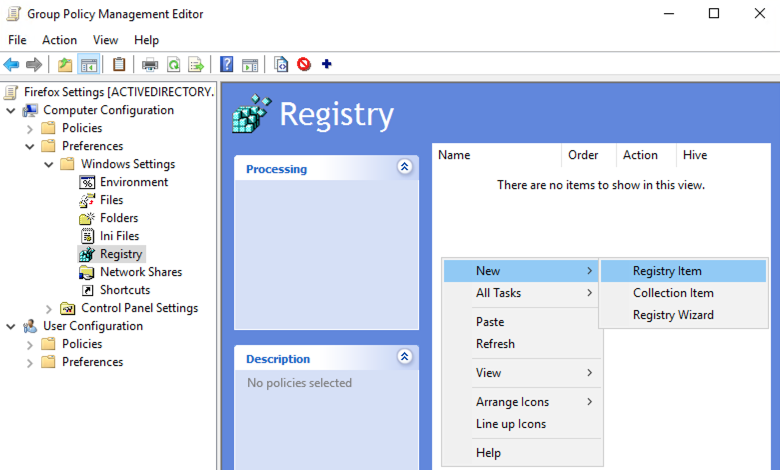
3. Next under Computer Configuration, expand Preferences > Windows Settings and select the Registry entry.
Right-click on the window pane to the right and select New > Registry Item.
4. Leave the default options unchanged and paste the following registry key into the Key Path field. Then click OK.
Software\Policies\Mozilla\Firefox\3rdparty\Extensions\{7c4c19b9-2441-4942-873e-cb9eeee18a97}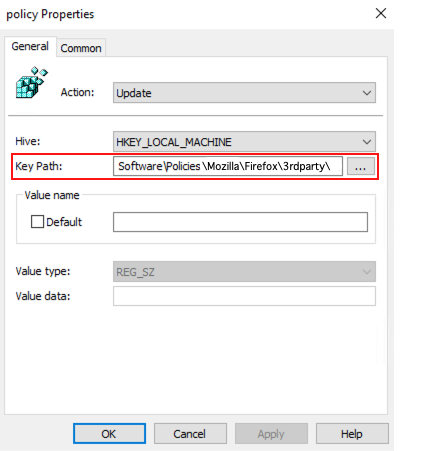
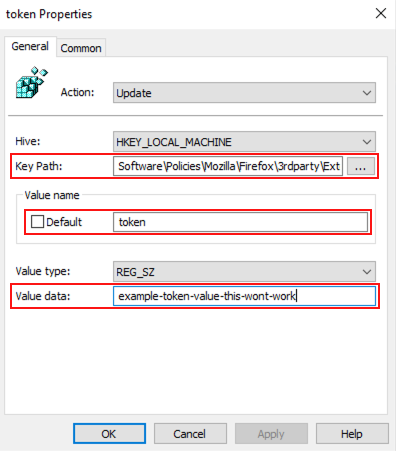
5. To create the next registry key, right-click in the window pane again and select New > Registry Item. Leave all the default options unchanged and paste the following registry key into the Key Path field. Do not click OK yet.
Software\Policies\Mozilla\Firefox\3rdparty\Extensions\{7c4c19b9-2441-4942-873e-cb9eeee18a97}6. Next, enter the word token into the Value name field. Note: Extension policies are case-sensitive. Make sure that the value token is all lowercase.
7. Change the Value type to REG_SZ and set the Value data field to the value provided in the token.txt file generated in the Push console:
example-token-value-this-wont-workFinally, click OK.
8. Verify that the Group Policy Management Editor window looks like the image below, showing the two registry entries created in the previous steps:
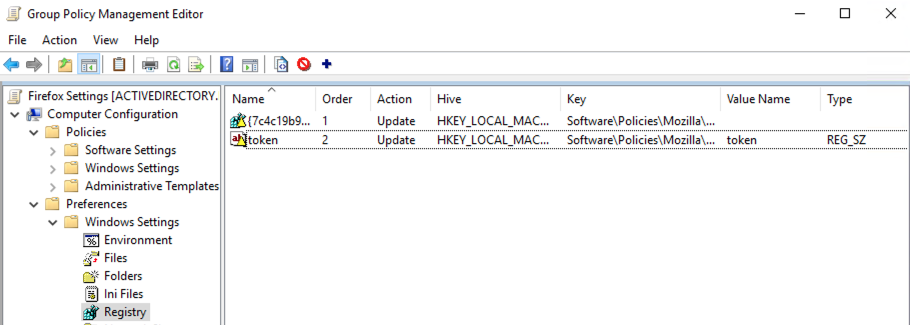
The registry keys should now start propagating to client machines affected by this group policy.
You can verify that the keys are created as intended by launching gpupdate.exe from a Run prompt. Then open regedit.exe and browse to the following location:
HKEY_LOCAL_MACHINE\Software\Policies\Mozilla\Firefox\3rdparty\Extensions\{7c4c19b9-2441-4942-873e-cb9eeee18a97}If the configured registry settings were applied successfully, the extension ID and token registry items configured in the previous steps will be visible.