Ready to help
Managed deployment using Microsoft Endpoint Manager (Intune)
In this section:
Overview
Deploy the Push browser extension for Google Chrome, Microsoft Edge, Firefox, and Brave using Microsoft Endpoint Manager (Intune).
Because the installation requires creating policies and deploying a PowerShell script, we recommend you implement the changes first in a test environment.
Note: If you are deploying the Push browser extension for multiple browsers, review each section of this documentation to avoid missing settings that need to be applied in each instance.
Deploying to Google Chrome
Generate the extension config
The first step is to generate a config file in the Push admin console. Skip to the next step if you've already done so.
1. In the Push admin console, go to Browsers > Enrollment options.
2. Then select a Managed enrollment.
3. Select Device Management Software, choose Chrome as the browser, and Windows as the OS. Then click Generate config. This will allow you to download a config file specific to your team.
4. Download and extract the zip file.
Create a configuration profile
In Microsoft Endpoint Manager, select Devices (1) > Configuration (2) > Create (3) > New Policy (4).
Select Windows 10 and later (5) as your target platform and Settings catalog (6) as the Profile type. Then click the Create (7) button.
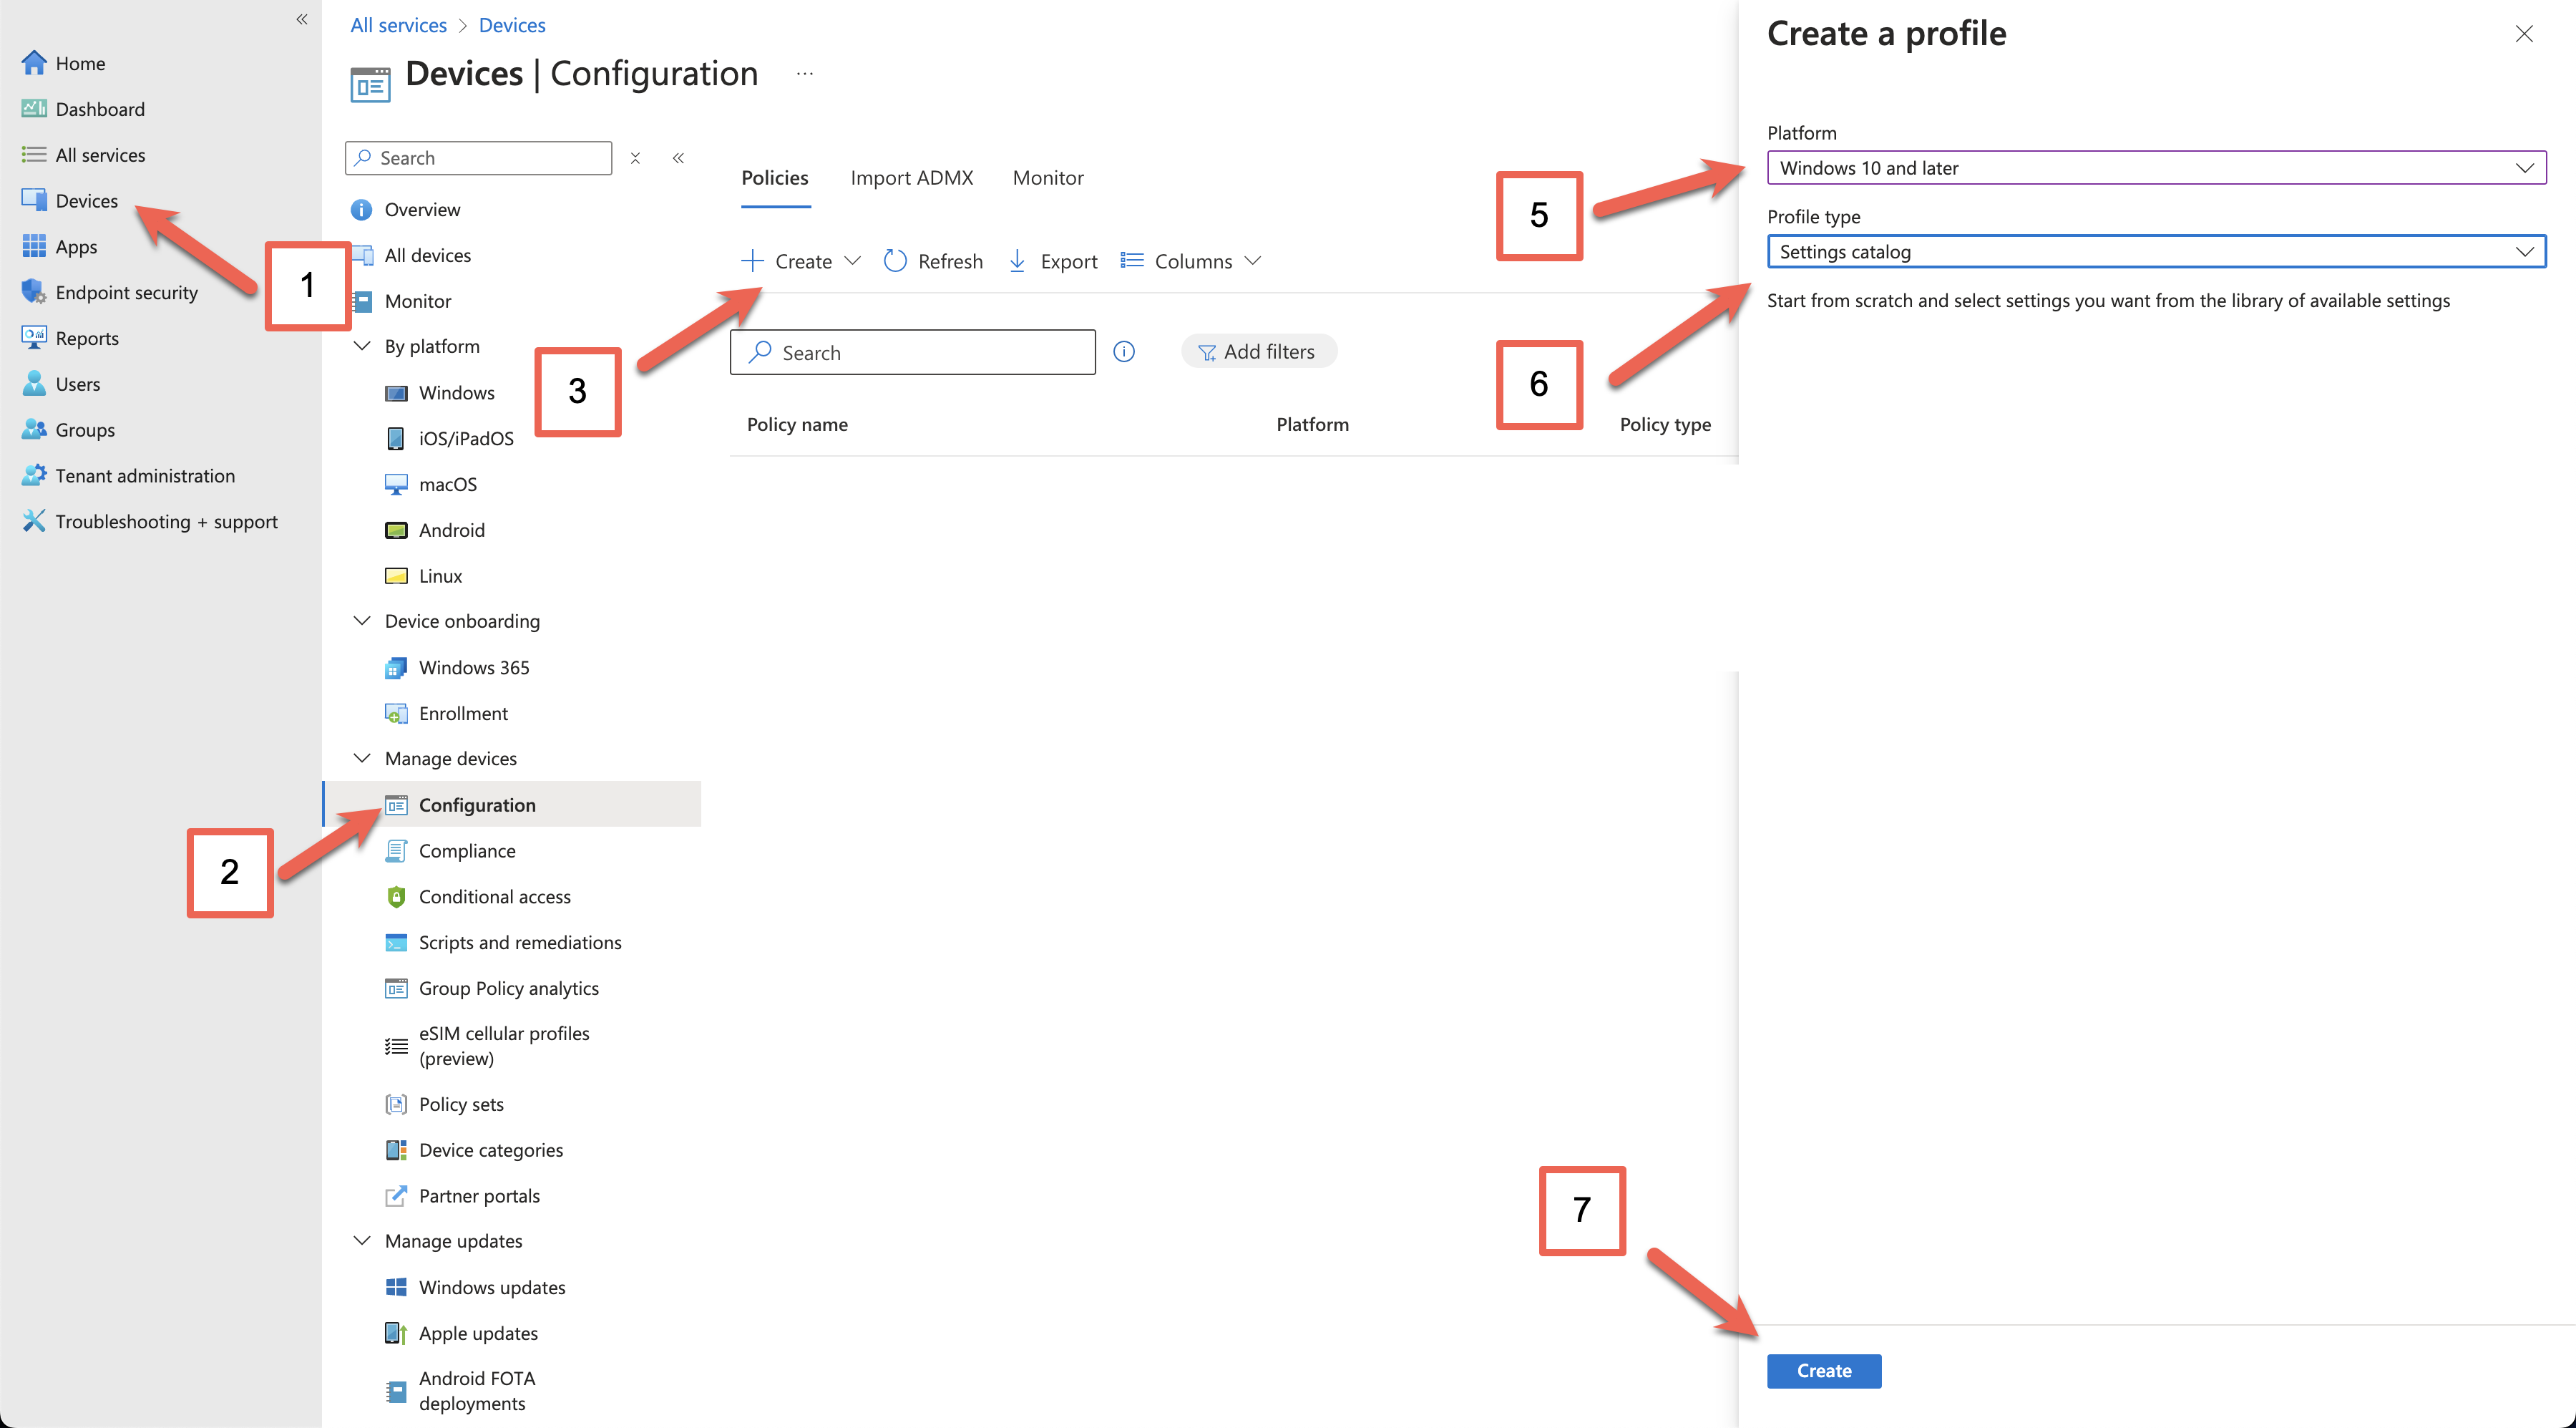
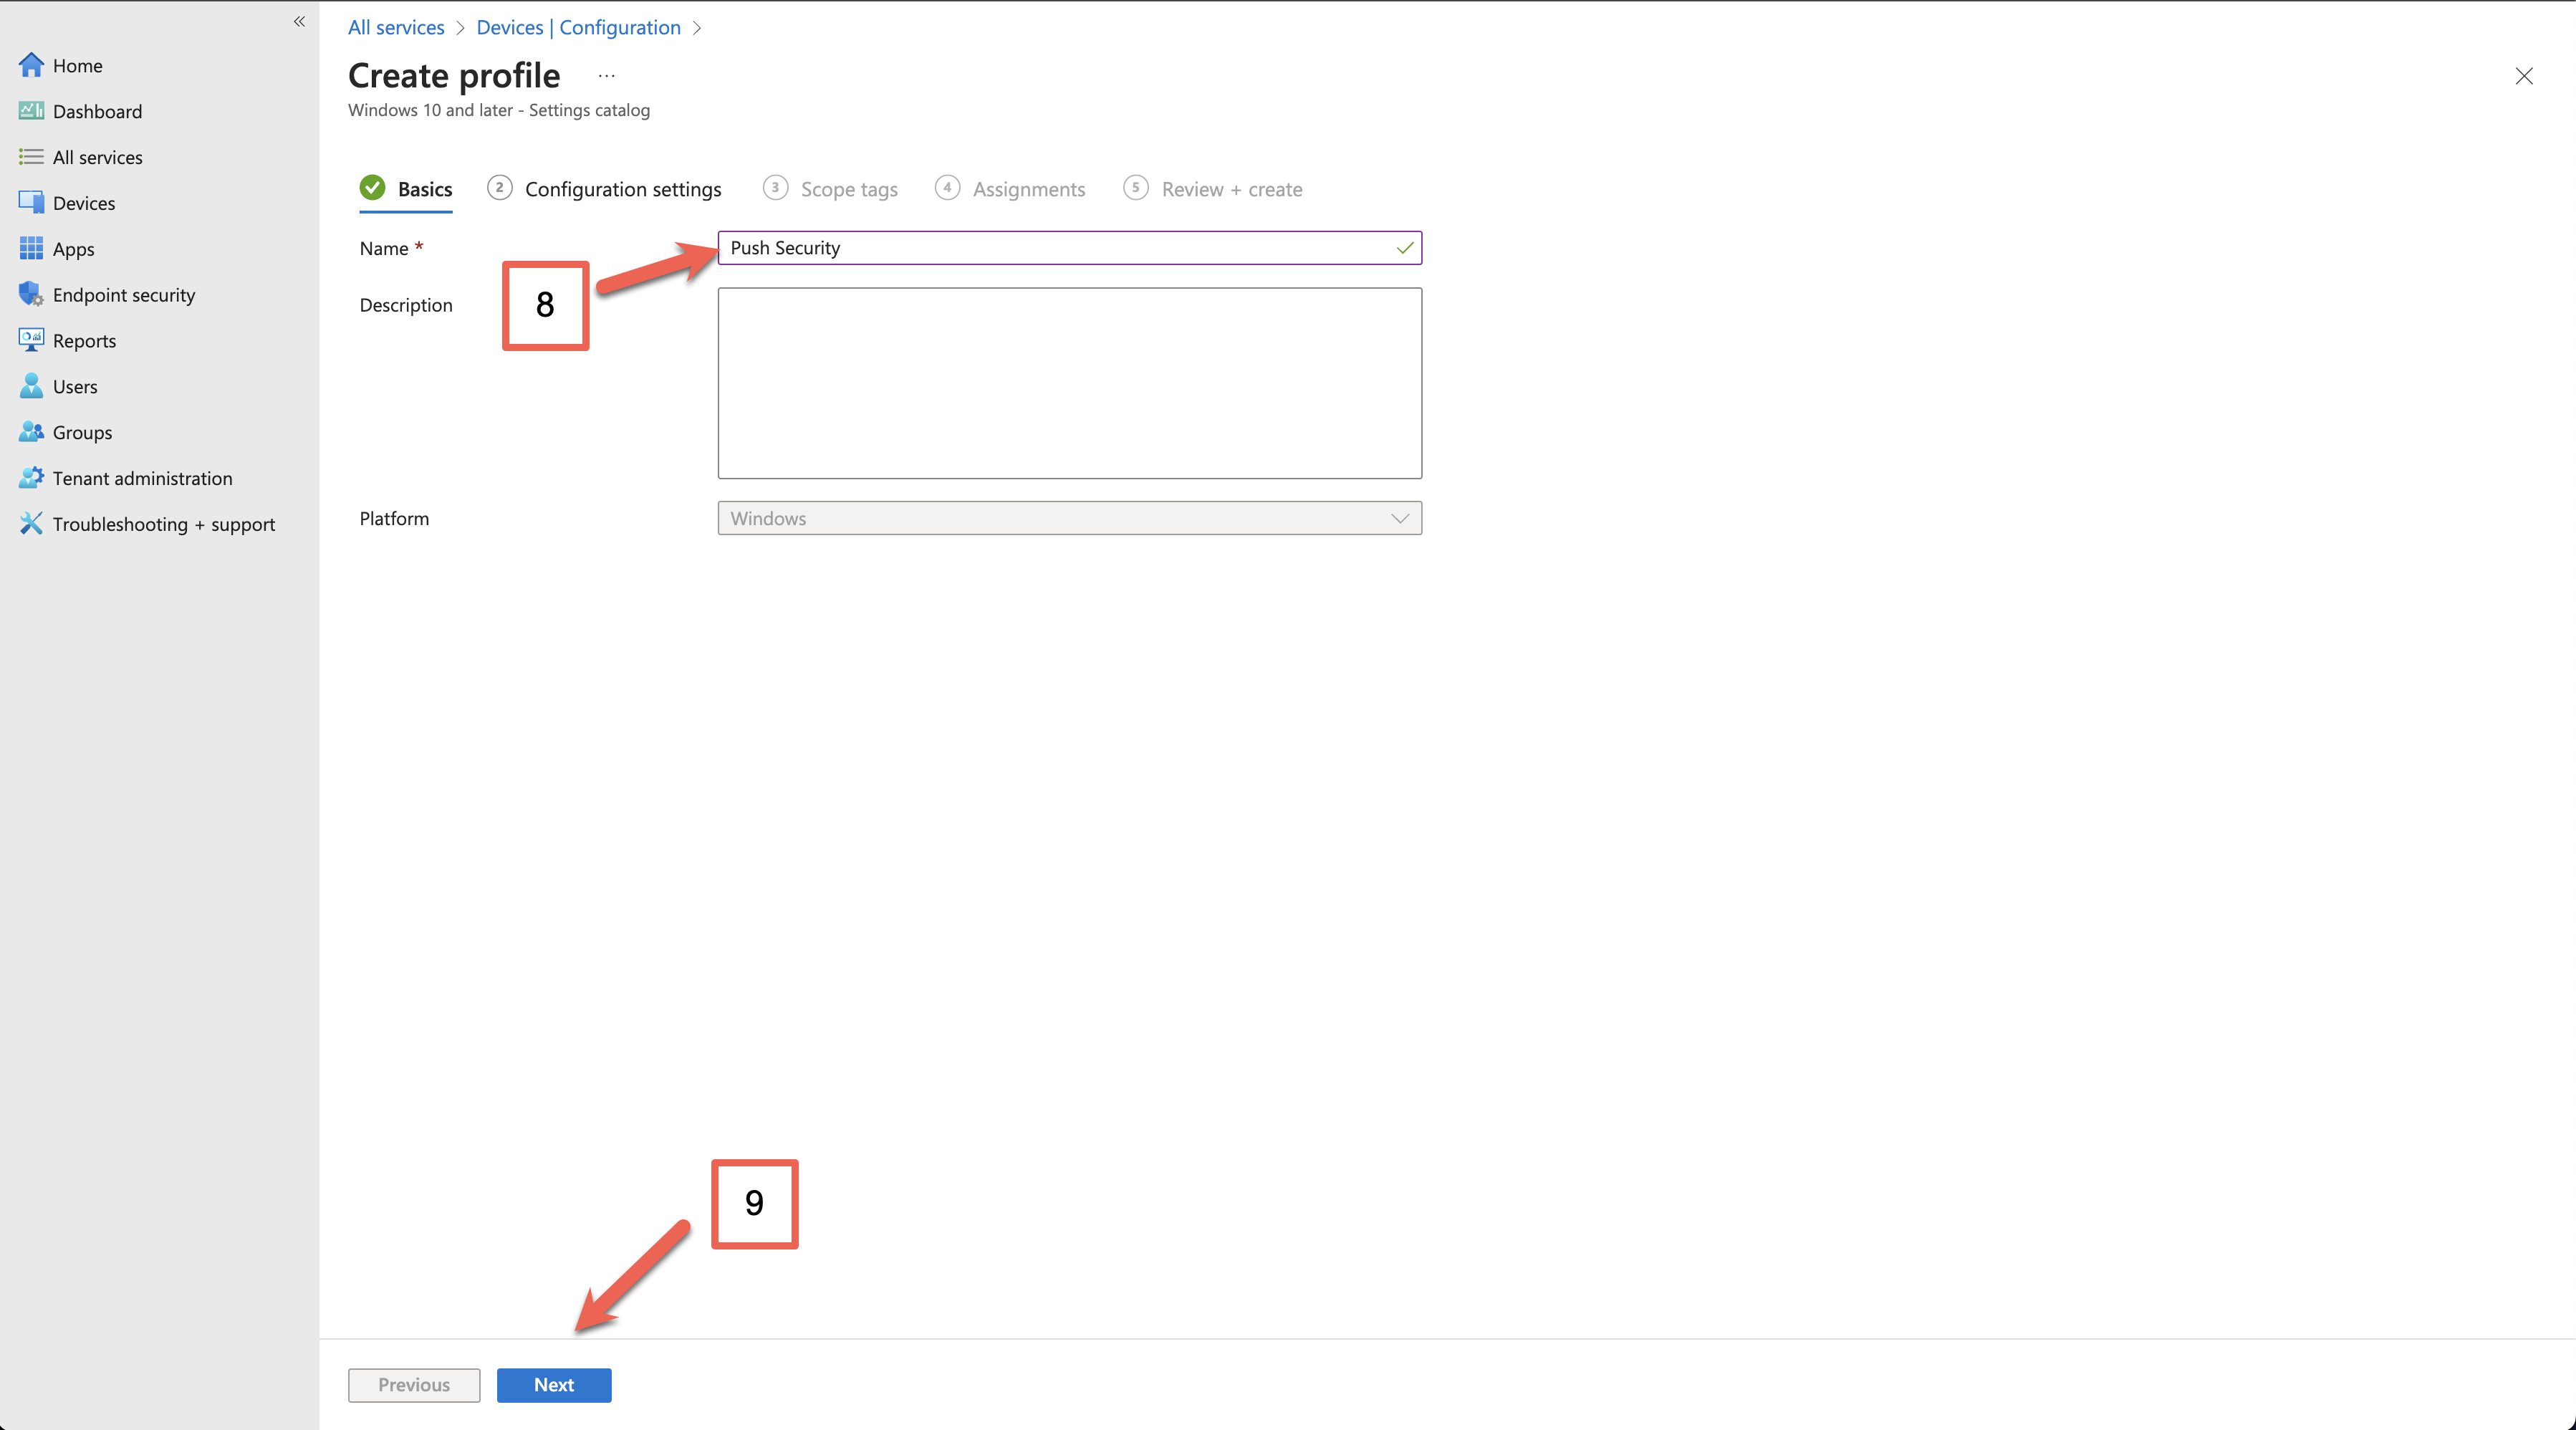
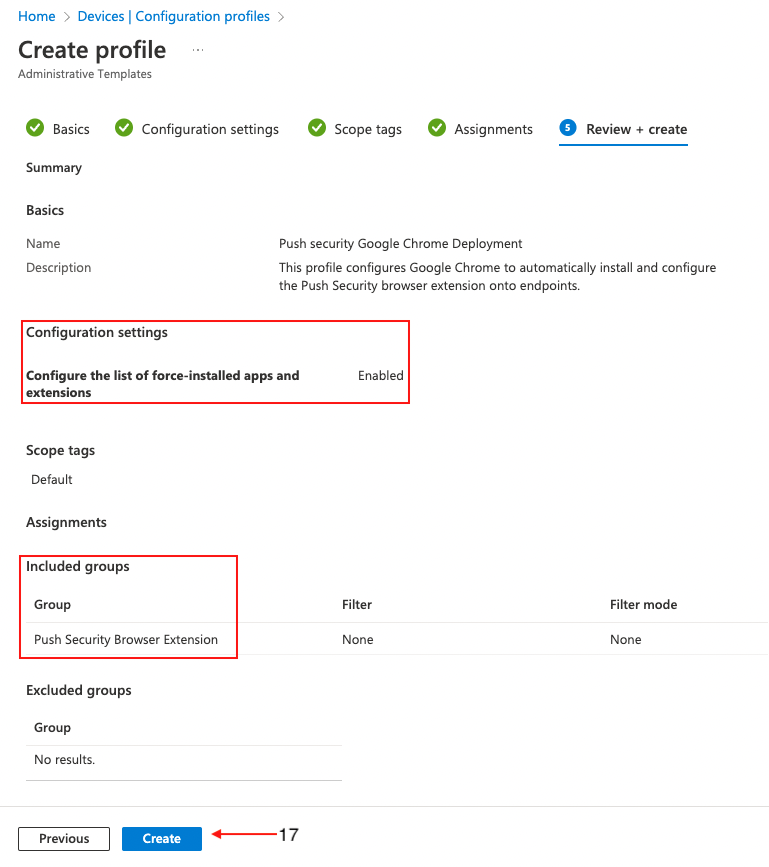
Enter a descriptive name for the profile (8), and a description if required, then click Next (9).
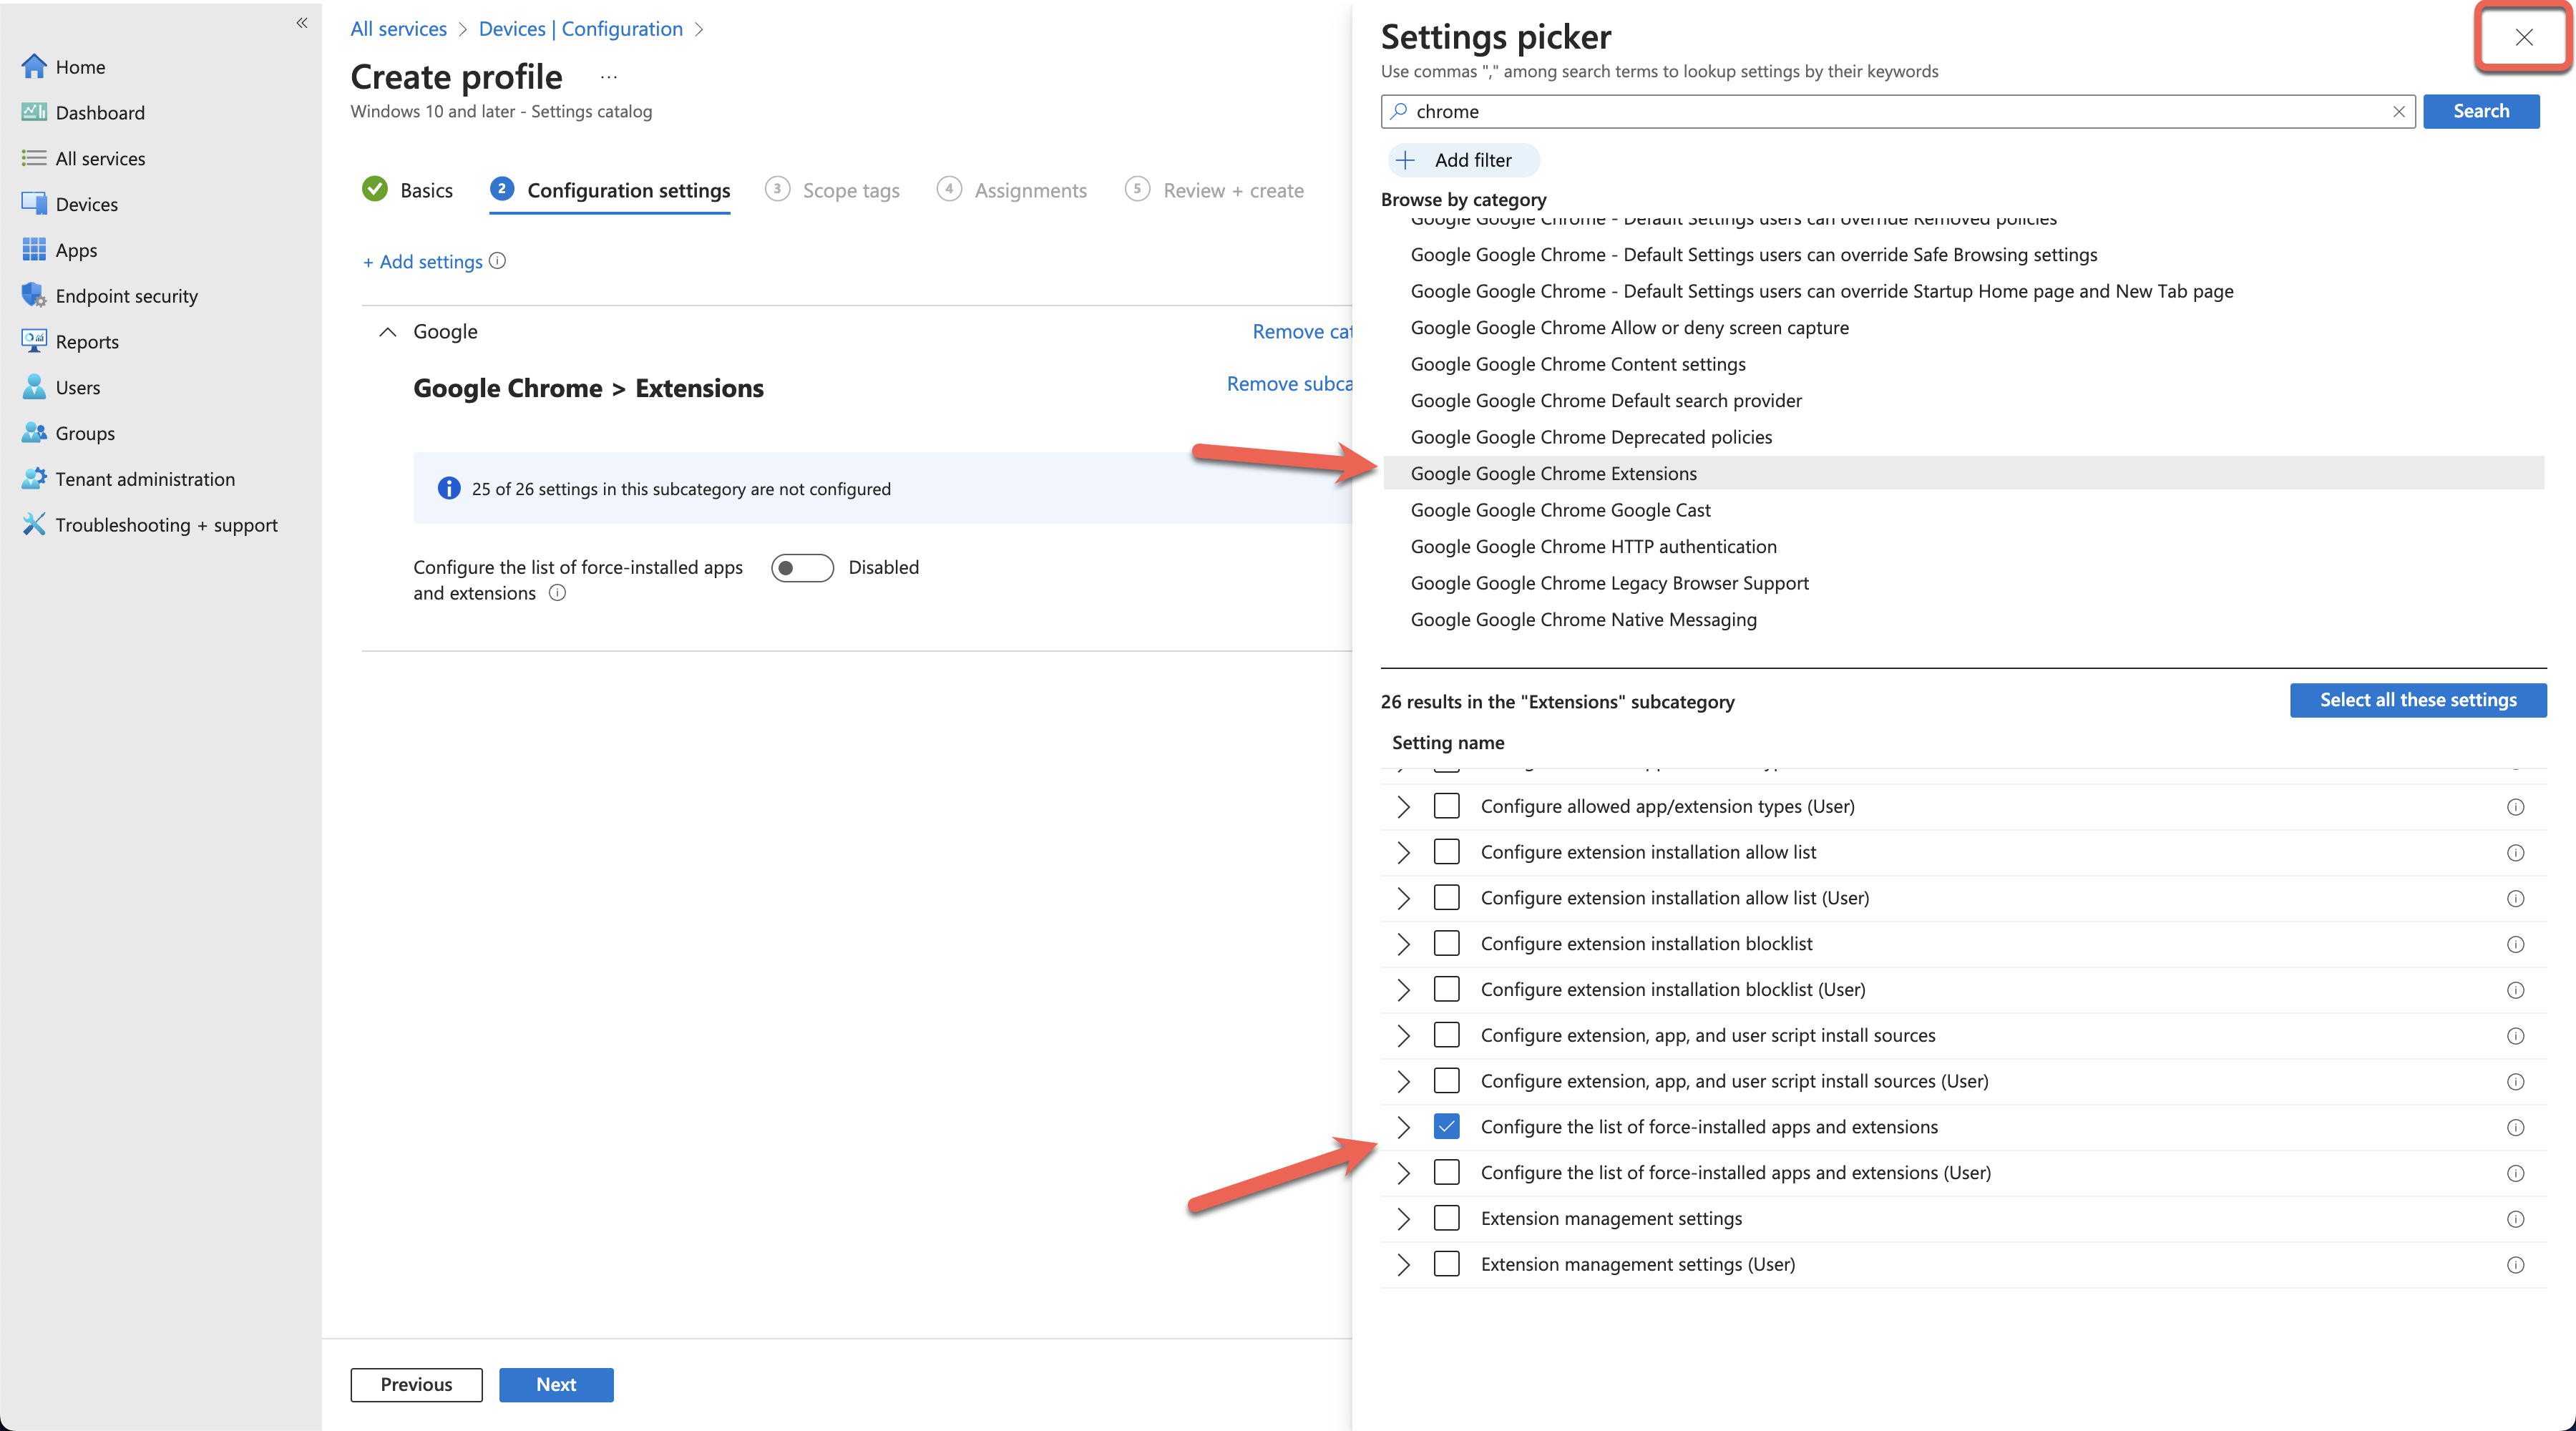
In the Setting picker, search for Chrome, select Google Chrome Extensions, and select Configure the list of force-installed apps and extensions. Then click the X at the top right.
Note: If you prefer to deploy the policies as user-scoped, you can do so by configuring the policies under Configure the list of force-installed apps and extensions (User) instead.
Toggle the Configure the list of force-installed apps to Enabled. Paste the following string into the value field:
dljjddkmmcminffjbcmeccgfbjlhmhlm;https://clients2.google.com/service/update2/crxClick Next at the bottom of the page and set any scope tags you require.
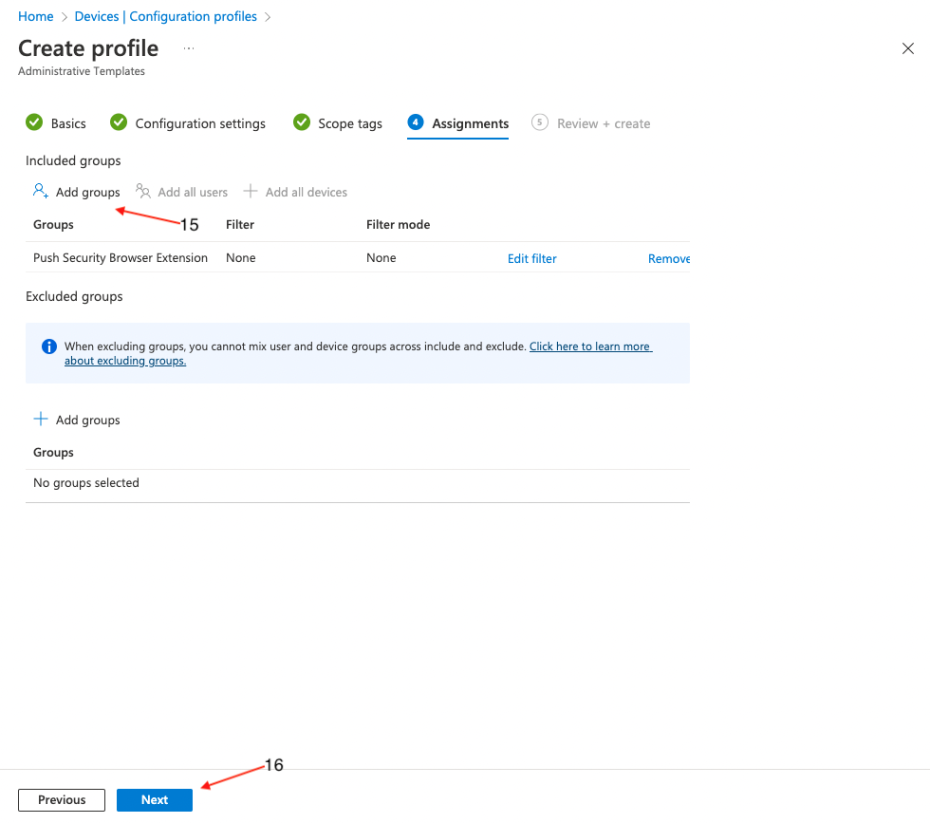
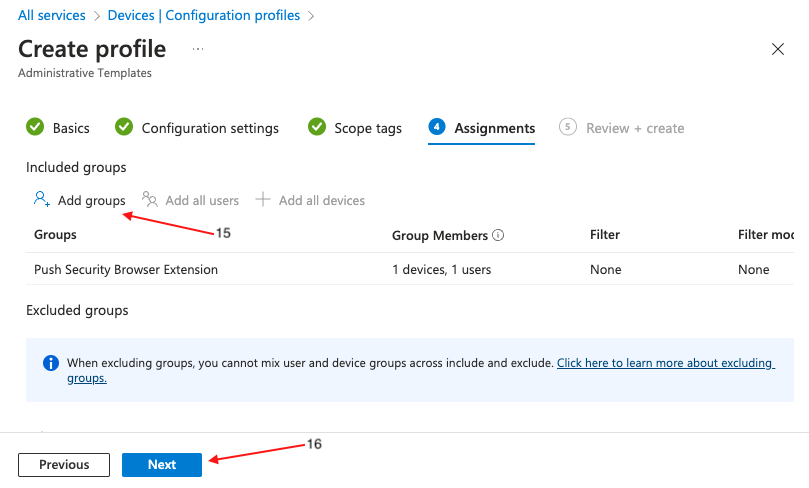
On the following page, assign target groups (15), or set it to apply to all users and groups, if required. Click Next (16).
On the final page, review the profile for any errors and finally click Create (17).
Create a PowerShell script
A few settings can't be configured via configuration profiles, so you'll need to create a PowerShell script that will run on each endpoint to finalize the configuration.
The script will create registry keys and values containing policy settings for the Push browser extension. It is not possible to create those values using administrative templates in Intune.
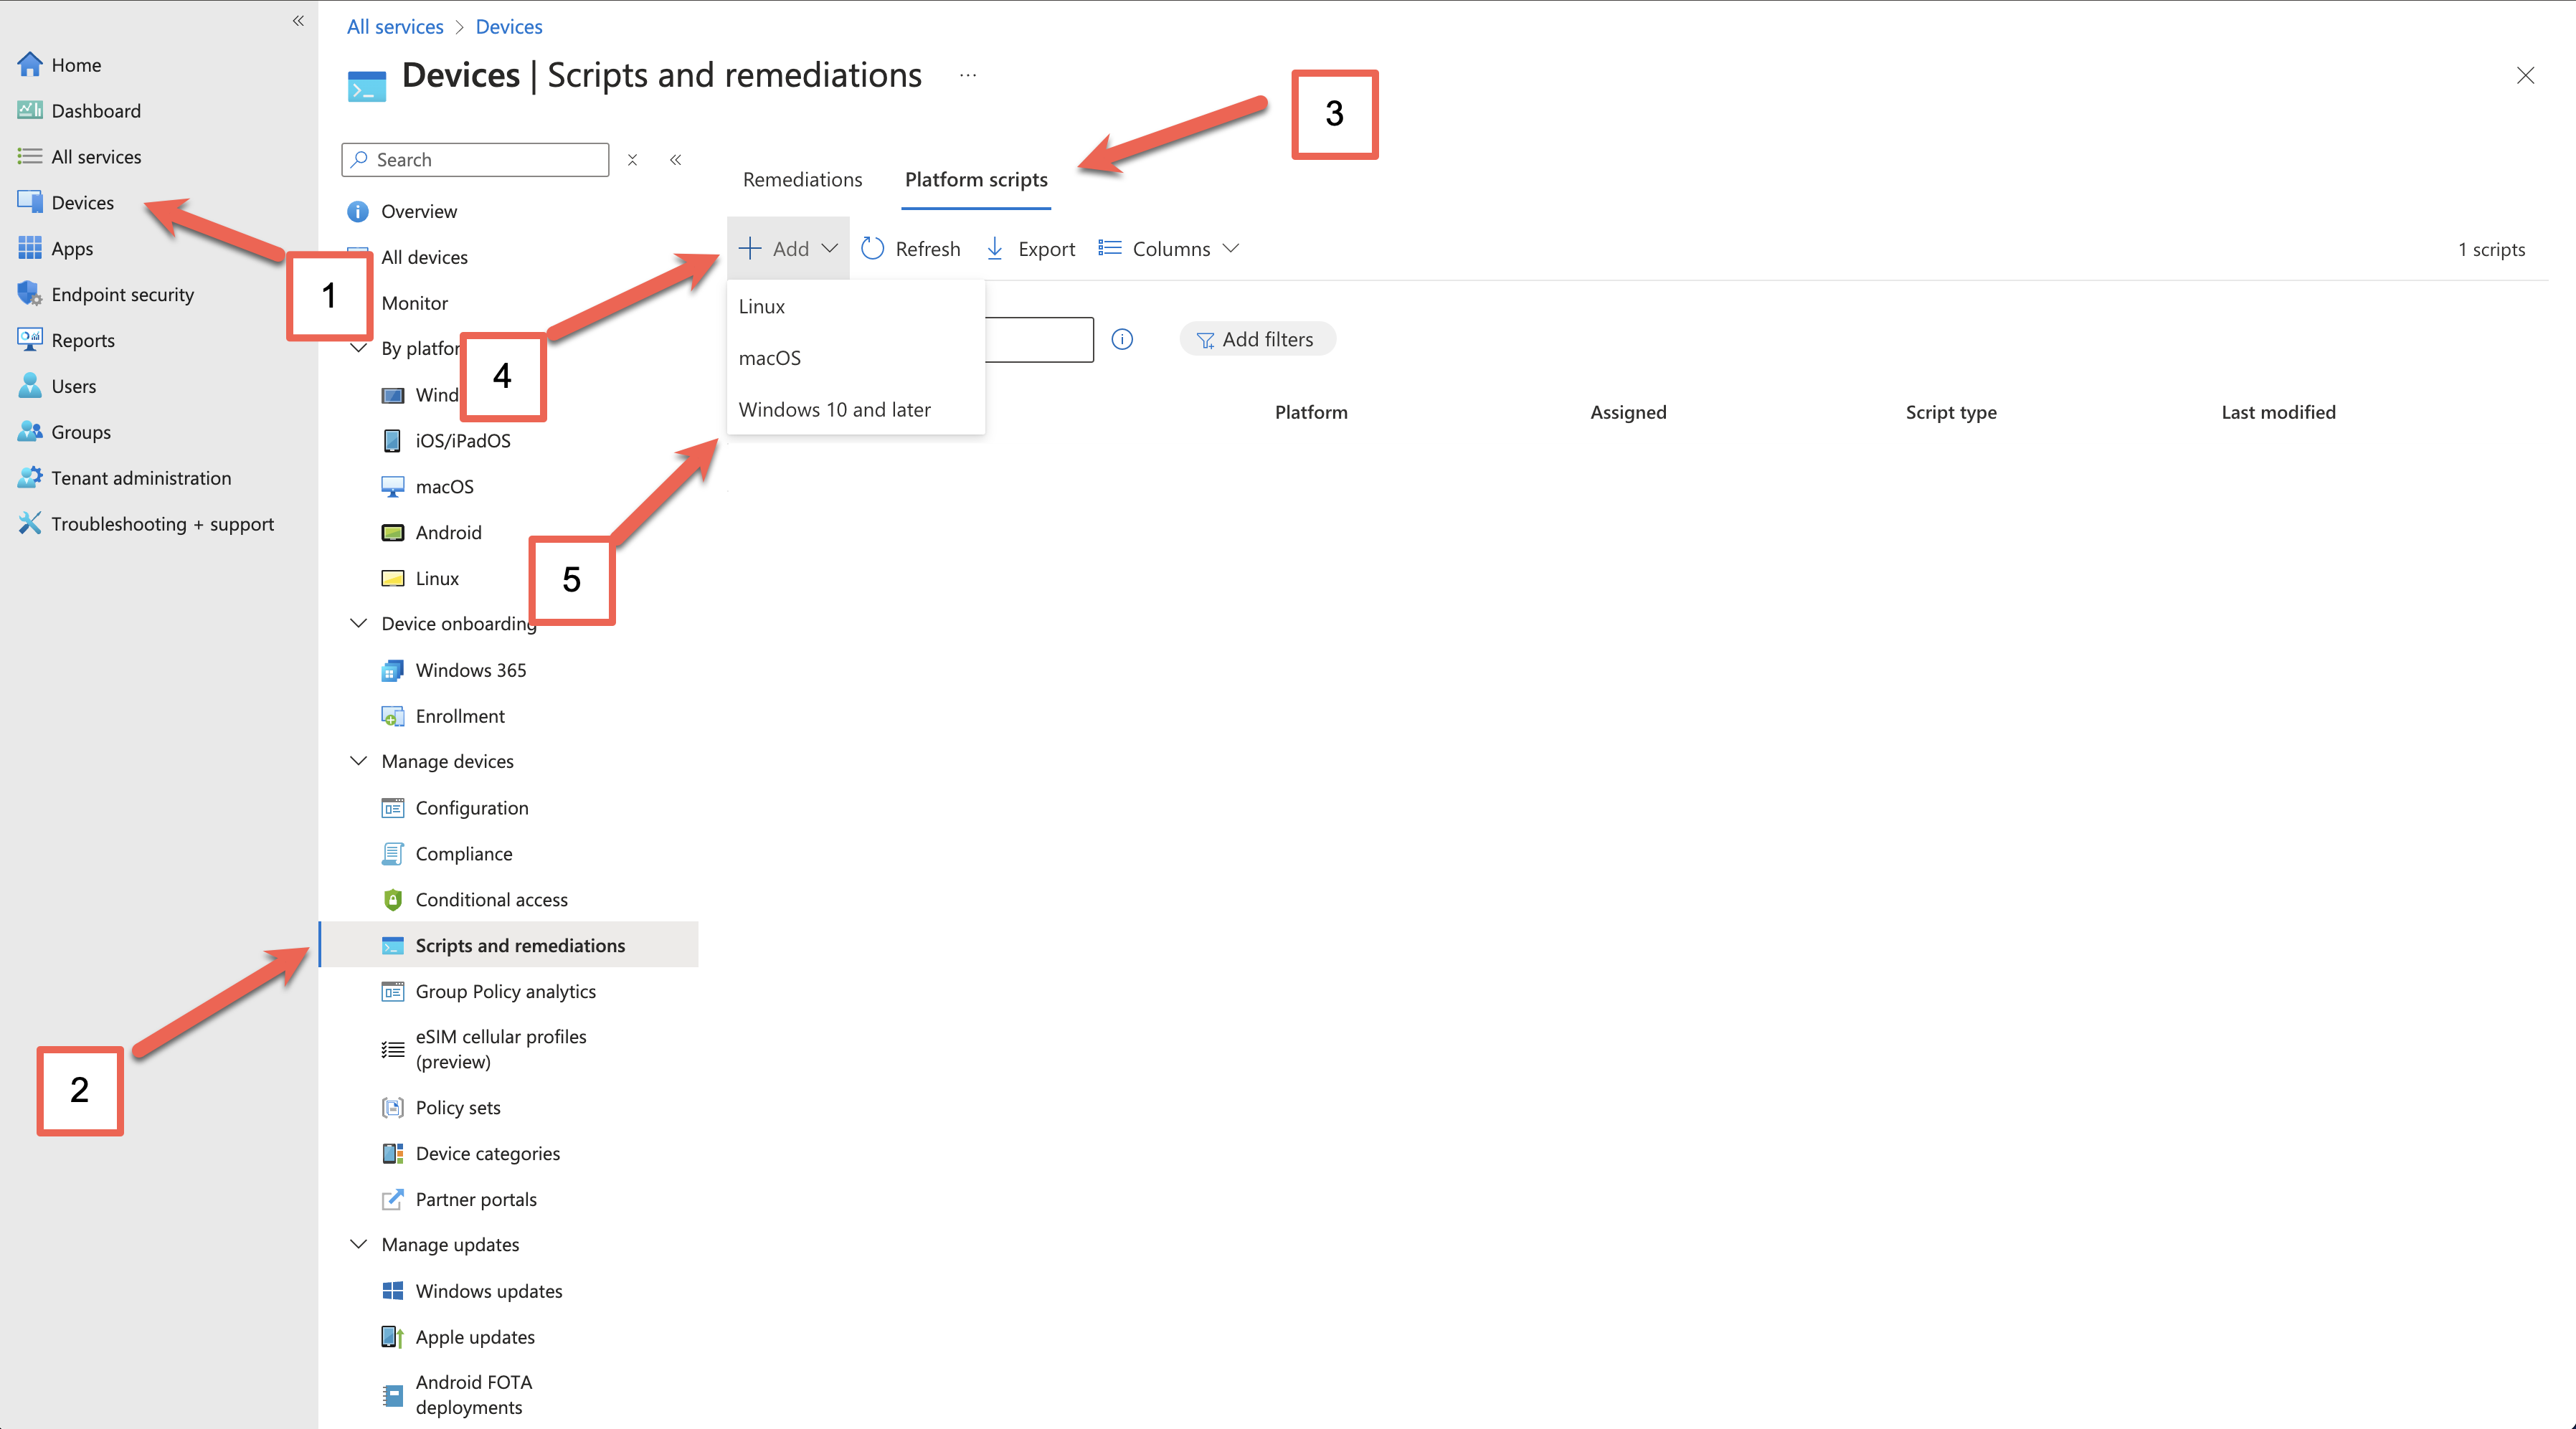
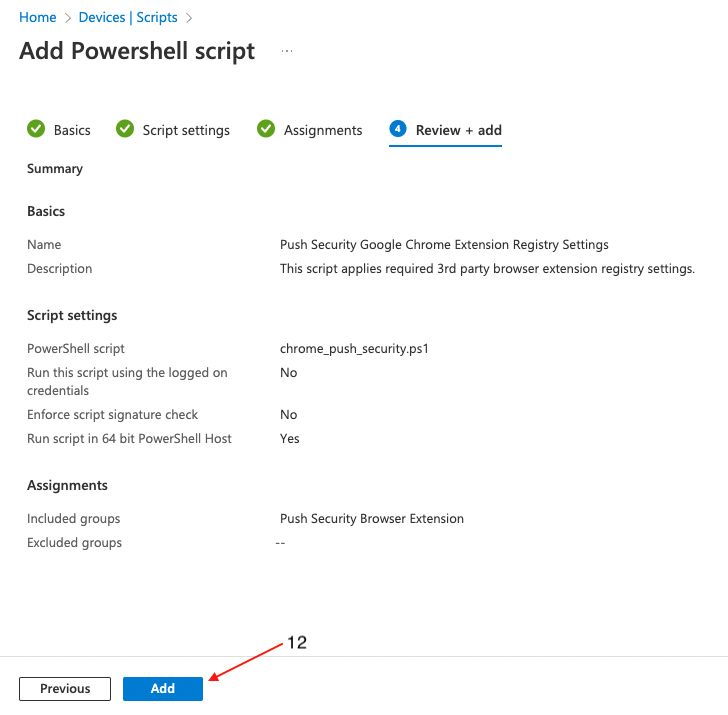
In Microsoft Endpoint Manager, click on Devices (1) > Scripts and remediations (2) > Platform scripts (3), Add (4) and then select Windows 10 and later (5) on the dropdown menu.
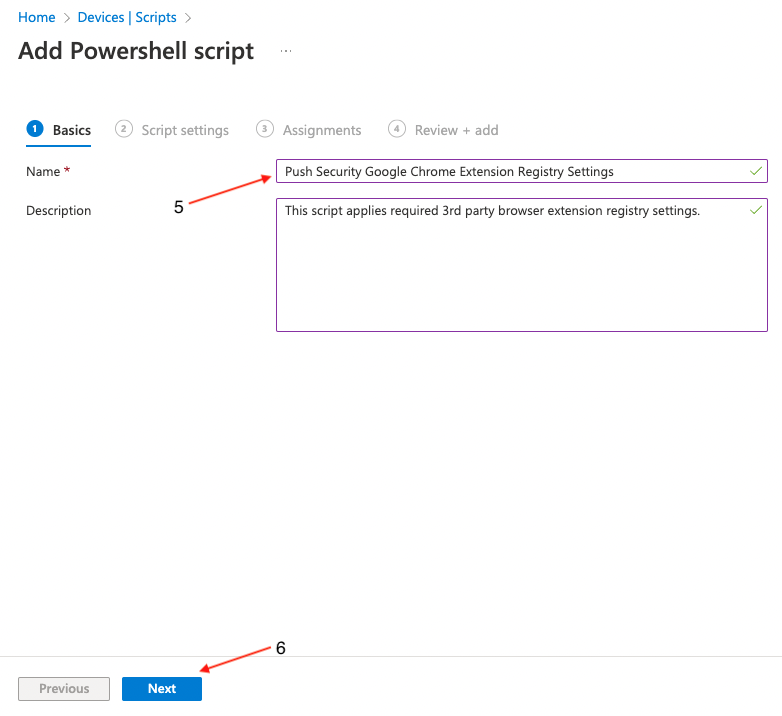
On the Add PowerShell script screen, provide a Name (5) for the script and an optional description. Then click Next (6).
Next, upload (8) chrome_push_security.ps1. This is included in the config.zip file you generated in the Push admin console.
Once uploaded, locate the option Run script in 64 bit PowerShell Host (8) and click Yes. This is an important step to make sure that the registry keys are created in the correct location on 64-bit hosts. Click Next (9).

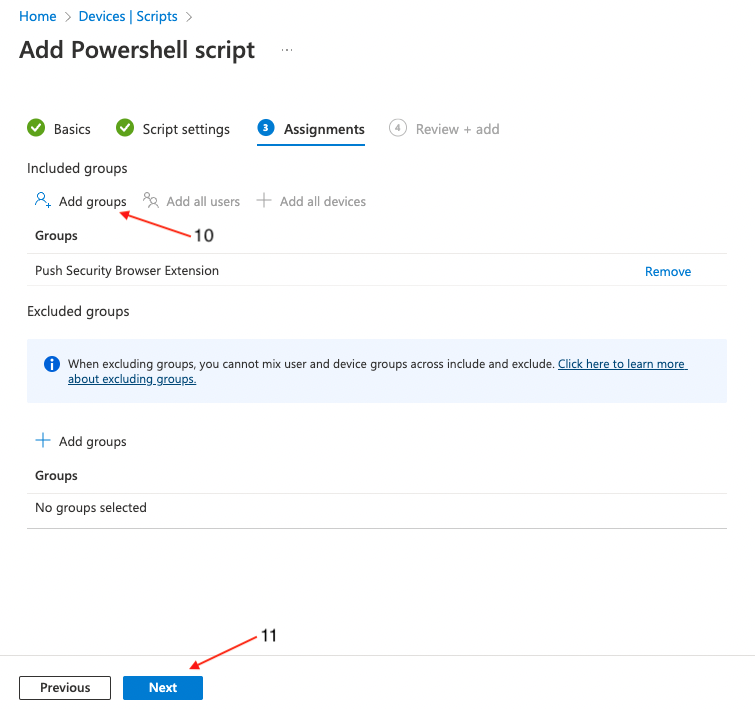
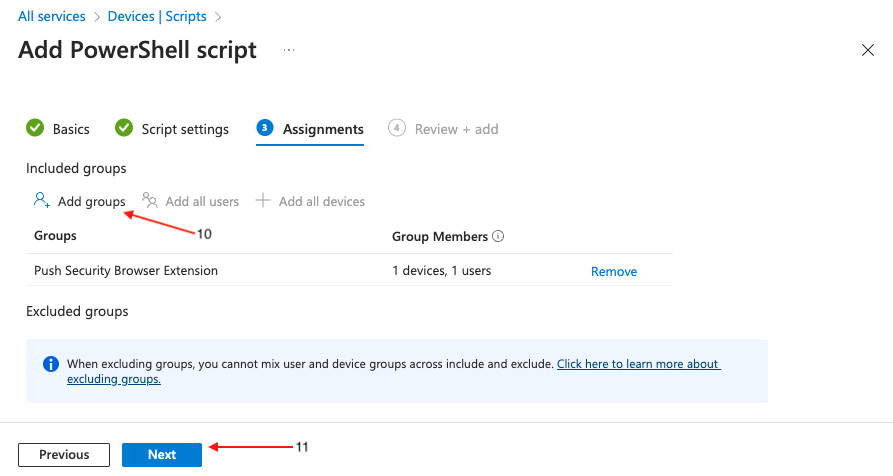
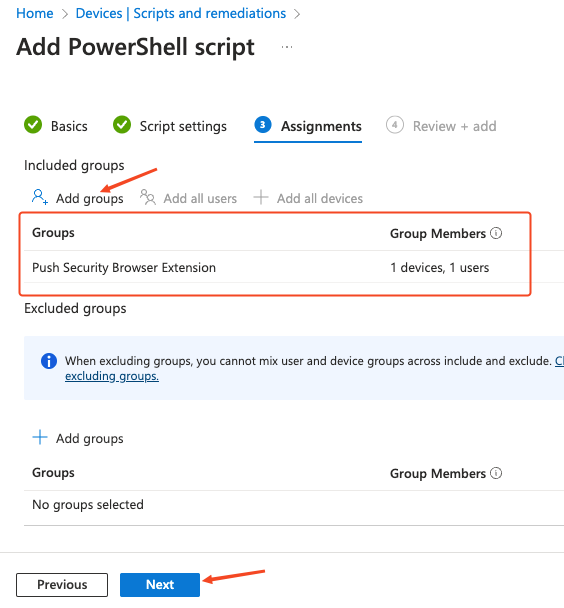
Click Add groups (10) to specify the group or groups you wish to deploy the settings to, or set it to apply to all users and groups. Click Next (11).
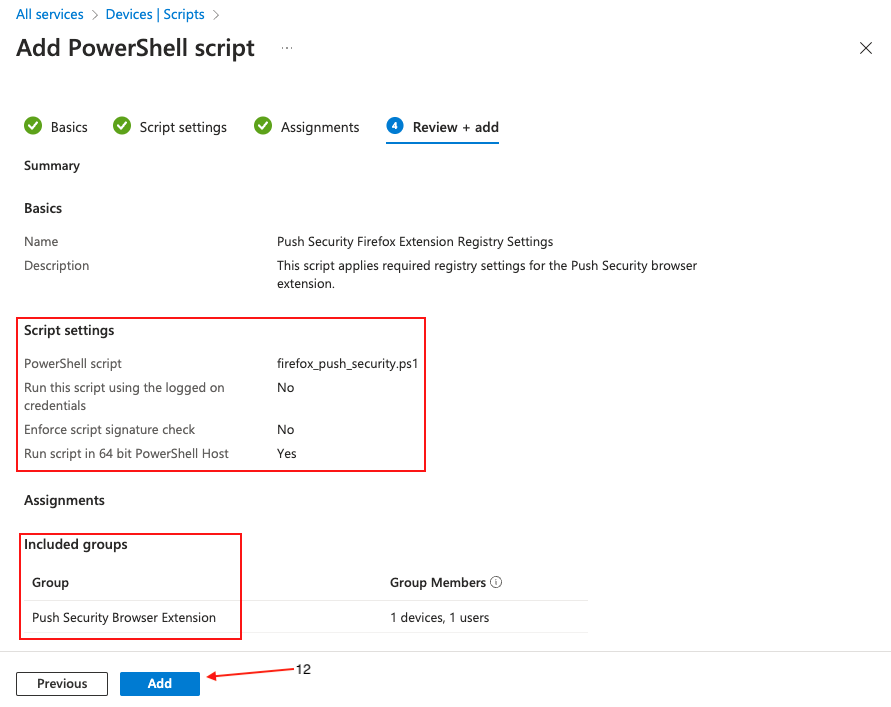
On the final page, review the profile for any errors and finally click Create (12).
Deploying to Microsoft Edge
Generate the extension config
The first step is to generate a config file in the Push admin console. Skip to the next step if you've already done so.
1. In the Push admin console, go to Browsers > Enrollment options.
2. Then select a Managed enrollment.
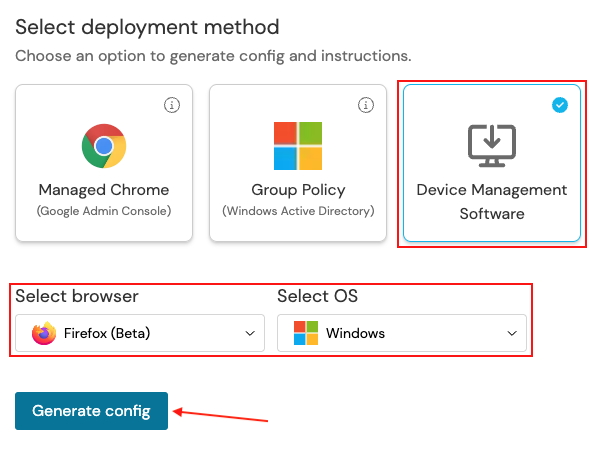
3. Select Device Management Software, choose Edge as the browser, and Windows as the OS. Then click Generate config. This will allow you to download a config file specific to your team.
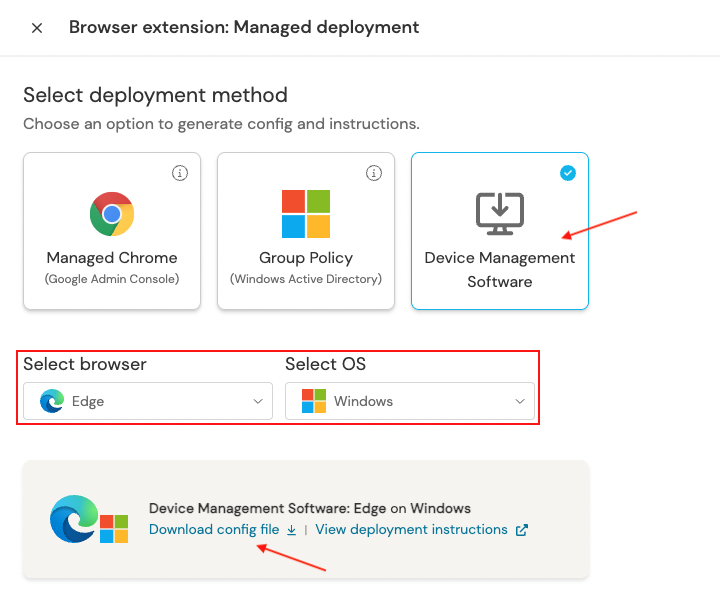
4. Download and extract the zip file.
Create a configuration profile
In Microsoft Endpoint Manager, select Devices (1) > Configuration profiles (2) > Create profile (3).
Select Windows 10 and later (4) as your target platform and Templates (5) as the Profile type. Then select Administrative Templates (6) then click the Create (7) button.
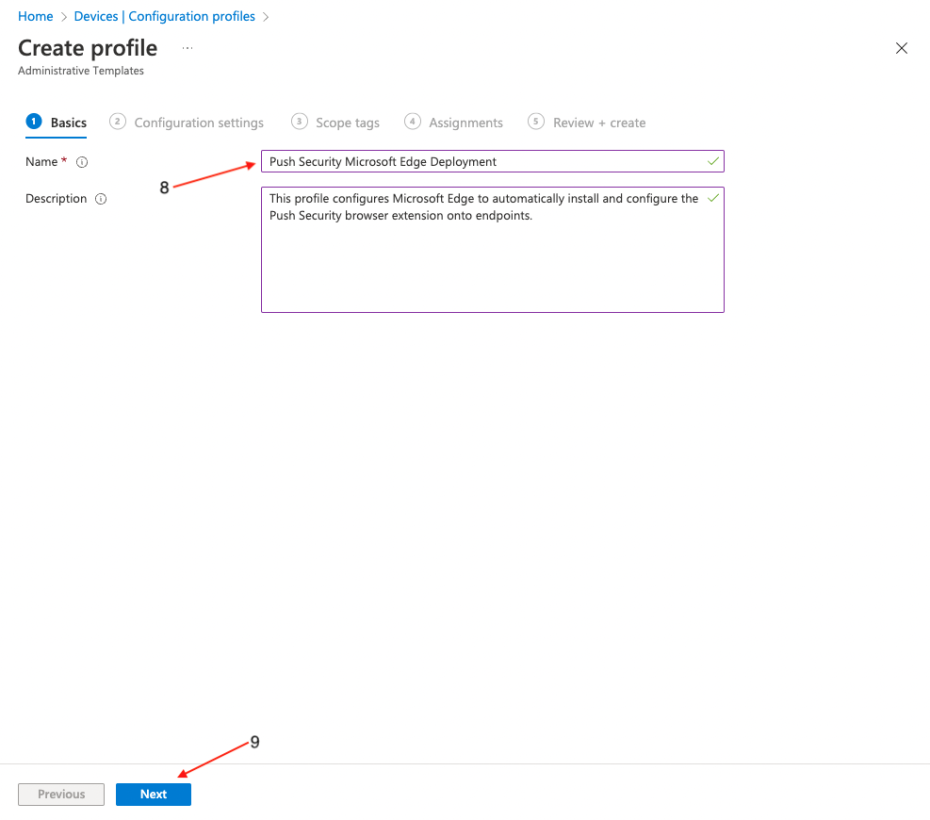
Enter a descriptive name for the profile (8), and a description if required, then click Next (9).
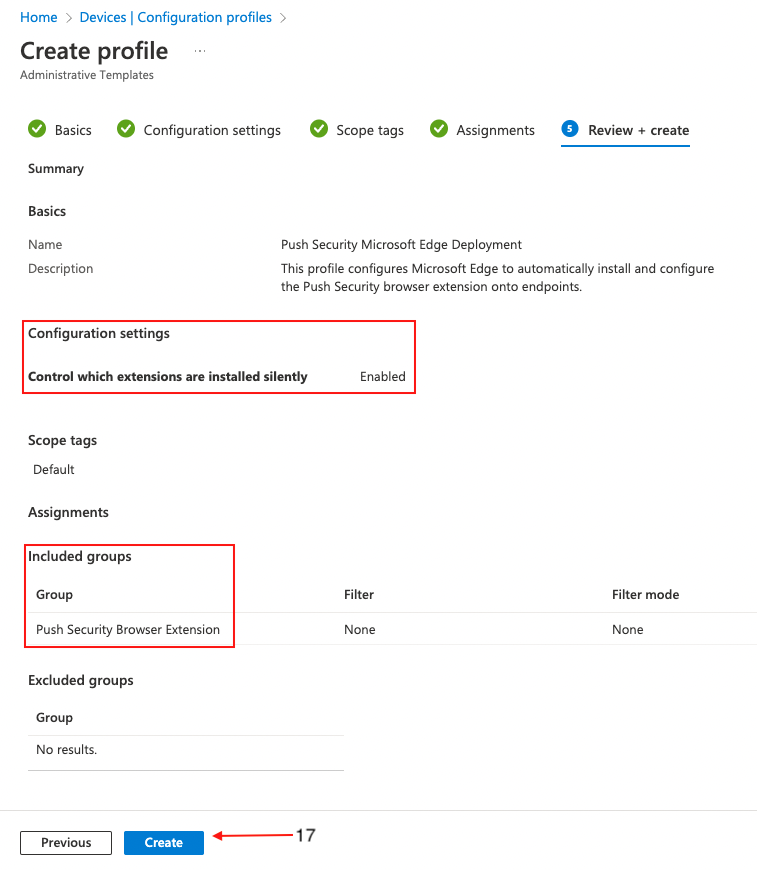
In the Setting picker, search for Edge, select Microsoft Edge\Extensions, and select Control which extensions are installed silently. Then click the X at the top right.
Note: If you prefer to deploy the policies as user-scoped, you can do so by configuring the policies under Control which extensions are installed silently (User) instead.

Toggle the Configure the list of force-installed apps to Enabled. Paste the following string into the value field:
dljjddkmmcminffjbcmeccgfbjlhmhlm;https://clients2.google.com/service/update2/crxNote: The URL following the extension is one associated with Google Chrome. This is intentional and should be configured as defined in this documentation for the extension to be successfully rolled out to Microsoft Edge browsers.
Click Next at the bottom of the page and set any scope tags you require.
On the following page, assign target groups (15), or set it to apply to all users and groups, if required. Click Next (16).
On the final page, review the profile for any errors and click Create (17).
Create a PowerShell script
A few settings can't be configured via configuration profiles, so you'll need to create a PowerShell script that will run on each endpoint to finalize the configuration.
The script will create registry keys and values containing policy settings for the Push browser extension. It is not possible to create those values using administrative templates in Intune.
In Microsoft Endpoint Manager, click on Devices (1) > Scripts and remediations (2) > Platform scripts (3), Add (4) and then select Windows 10 and later (5) on the dropdown menu.
On the Add PowerShell script screen, provide a Name (5) for the script and an optional description. Then click Next (6).
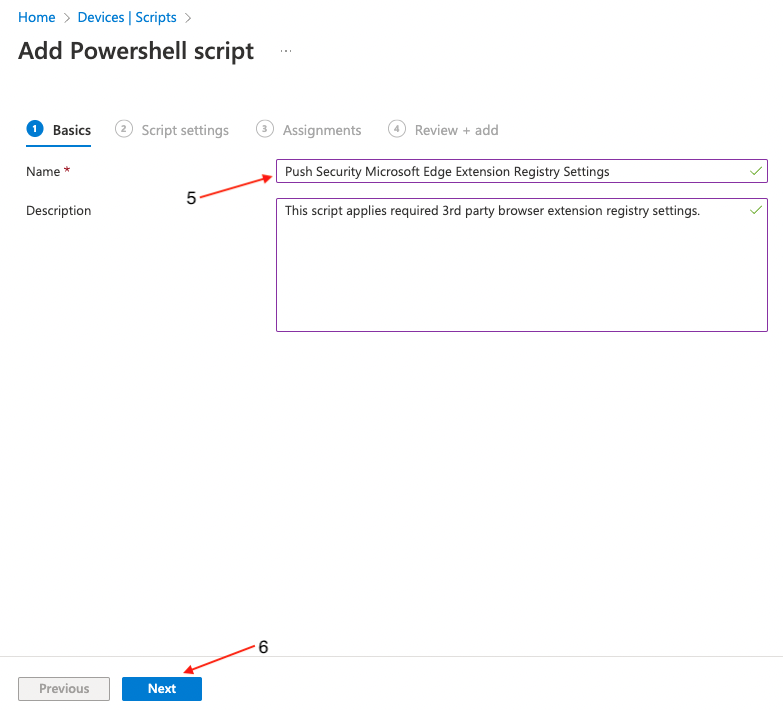
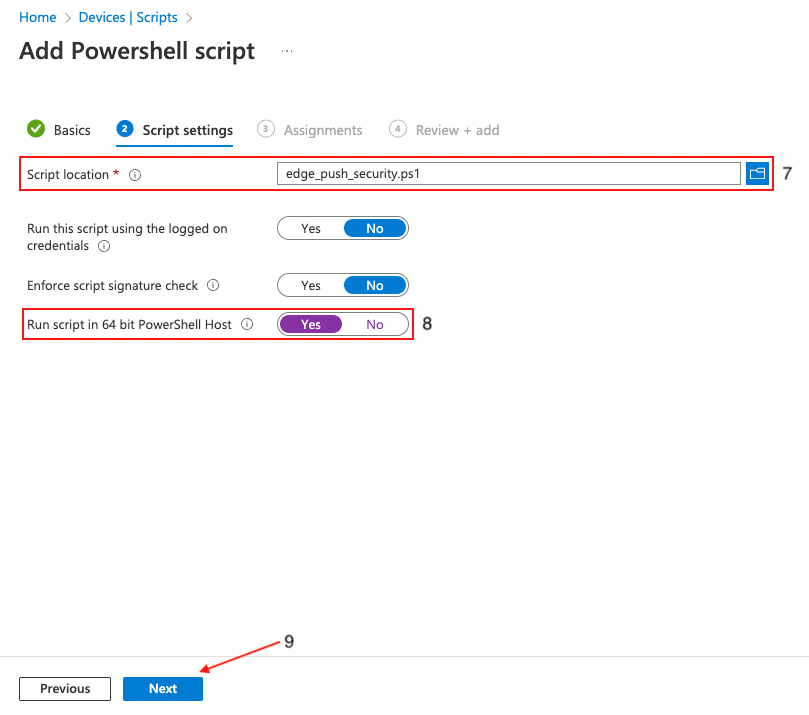
Next, upload (8) chrome_push_security.ps1. This is included in the config.zip file you generated in the Push admin console.
Once uploaded, locate the option Run script in 64 bit PowerShell Host (8) and click Yes. This is an important step to make sure that the registry keys are created in the correct location on 64-bit hosts. Click Next (9).
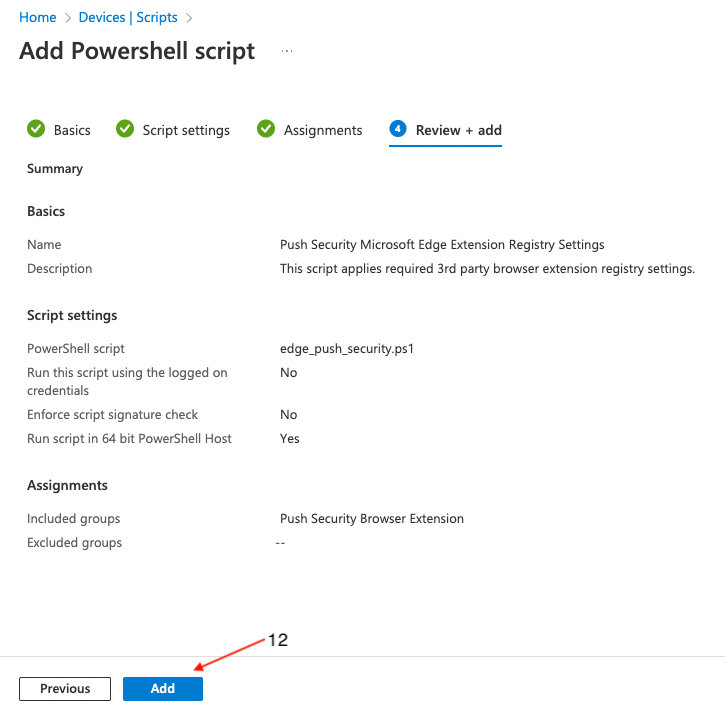
Click Add groups (10) to specify the group or groups you wish to deploy the settings to, or set it to apply to all users and groups if required. Click Next (11).
On the final page, review the profile for any errors and finally click Create (12).
Deploying to Firefox
Generate the extension config
The first step is to generate a config file in the Push admin console. Skip to the next step if you've already done so.
1. In the Push admin console, go to Browsers > Enrollment options.
2. Then select a Managed enrollment.
3. Select Device Management Software, choose Firefox as the browser, and Windows as the OS. Then click Generate config. This will allow you to download a config file specific to your team.
4. Download and extract the zip file.
Import the Firefox ADMX templates
Intune includes ADMX templates for Google Chrome and Microsoft Edge by default. However, for Firefox, we’ll need to import the templates before we can apply any of the deployment settings.
1. To begin, get the required files from Mozilla. Download the policy_templates_vX.YY.zip file associated with the latest release.
2. Extract the policy files. Remember the location of these files as you'll be importing them into Intune in the next step.
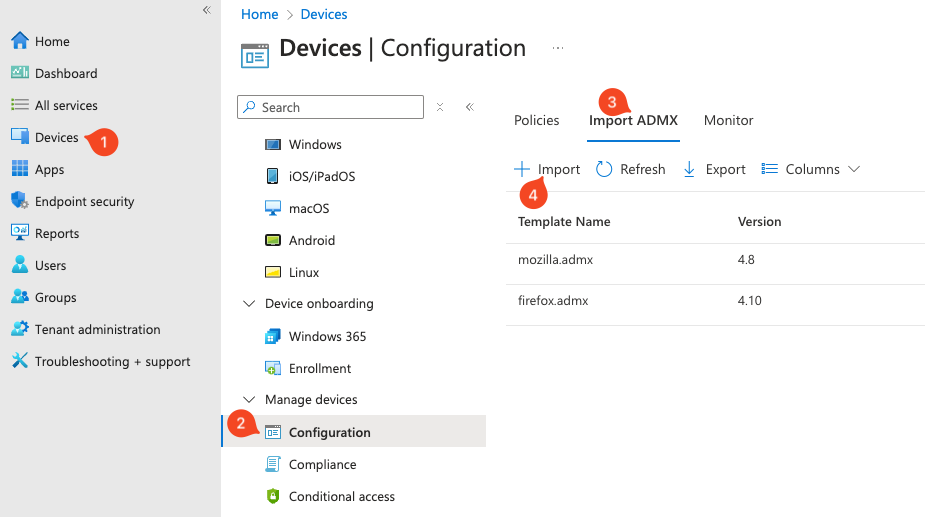
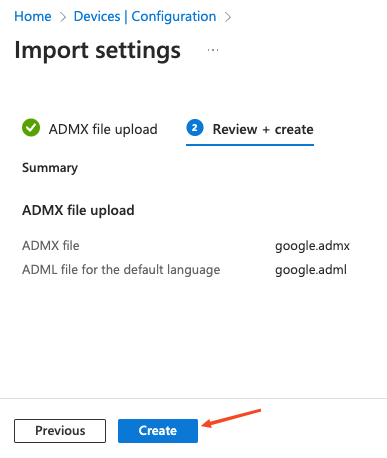
3. In Microsoft Endpoint Manager, select Devices (1) > Configuration Profiles (2) > Import ADMX (3) > Import (4).
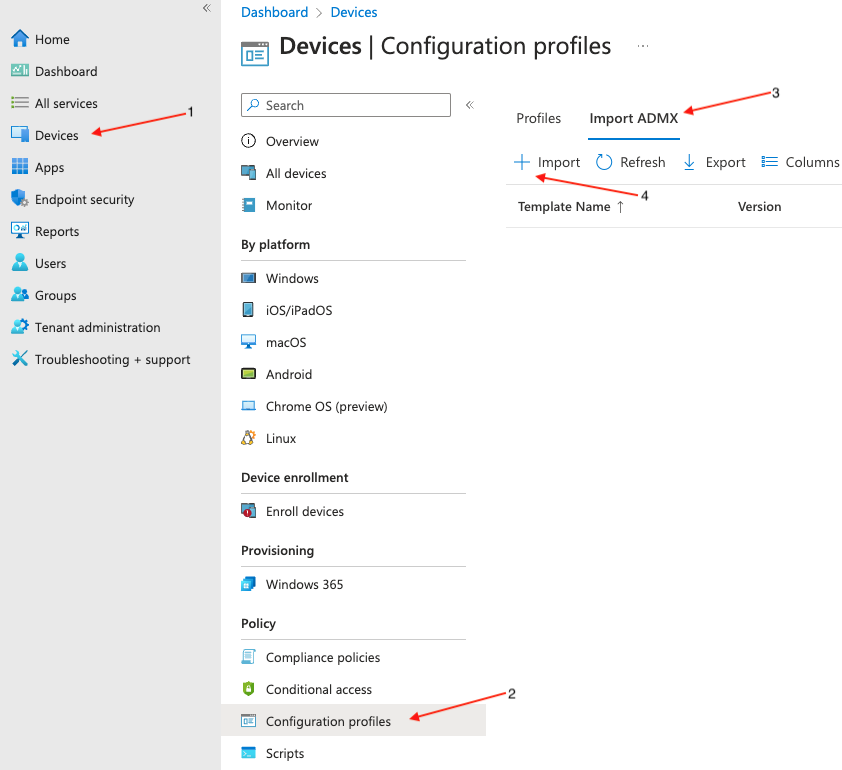
4. Import the ADMX templates. This is a two-part process because you need to import both the mozilla.* and firefox.* templates.
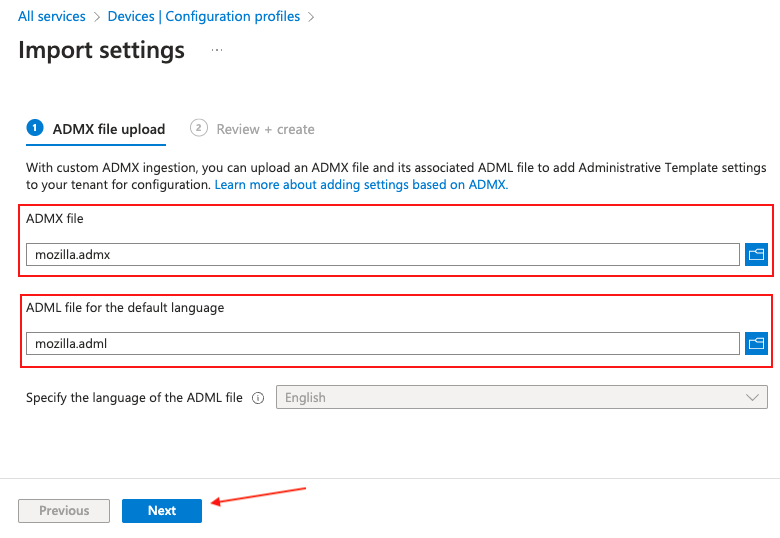
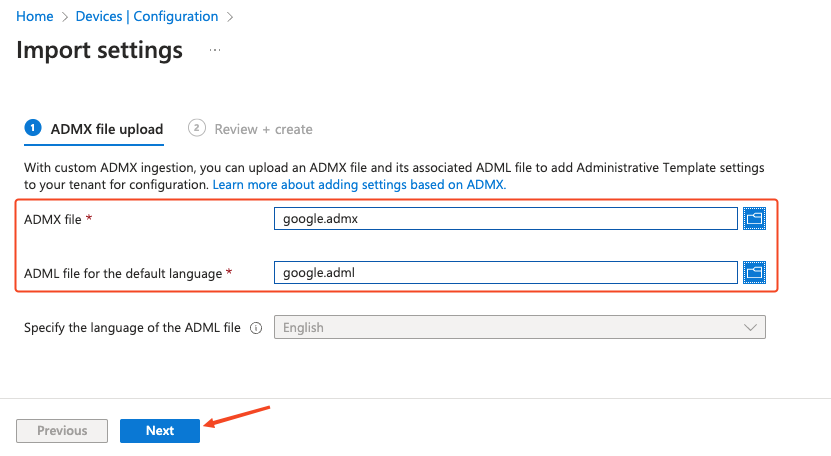
First, click on the ADMX file selector and browse to the location where the policy templates were extracted. Select and import mozilla.admx.
Next, in the ADML file selector, locate the mozilla.adml file underneath the language locale policy templates folder.
Finally, click Next.
On the following screen, select Create.
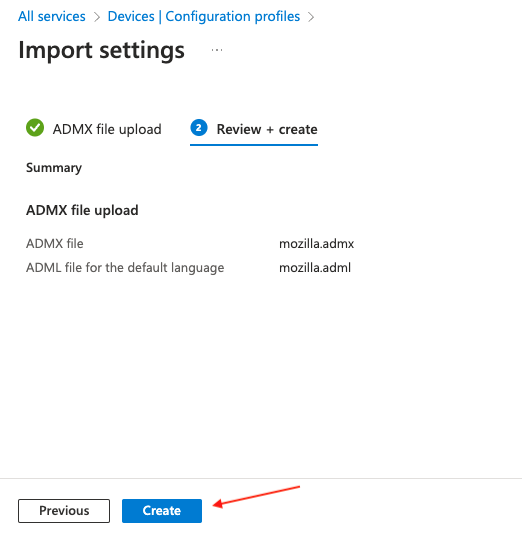
Note: Before proceeding, wait for Intune to finish importing the template. This is an important step because the Firefox templates are dependent on these being imported.
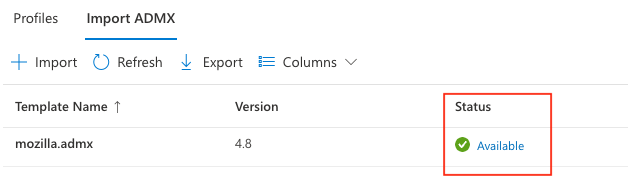
Next, repeat the previous steps, but import the firefox.admx and firefox.adml template files instead.
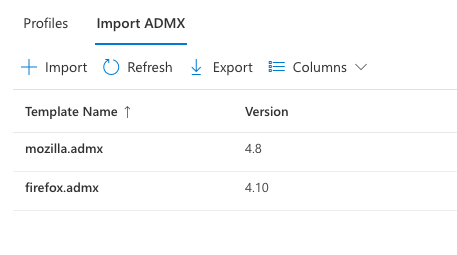
Once complete, the page should show that both templates have been successfully imported.
You're now ready to create a configuration profile for Firefox.
Create a configuration profile
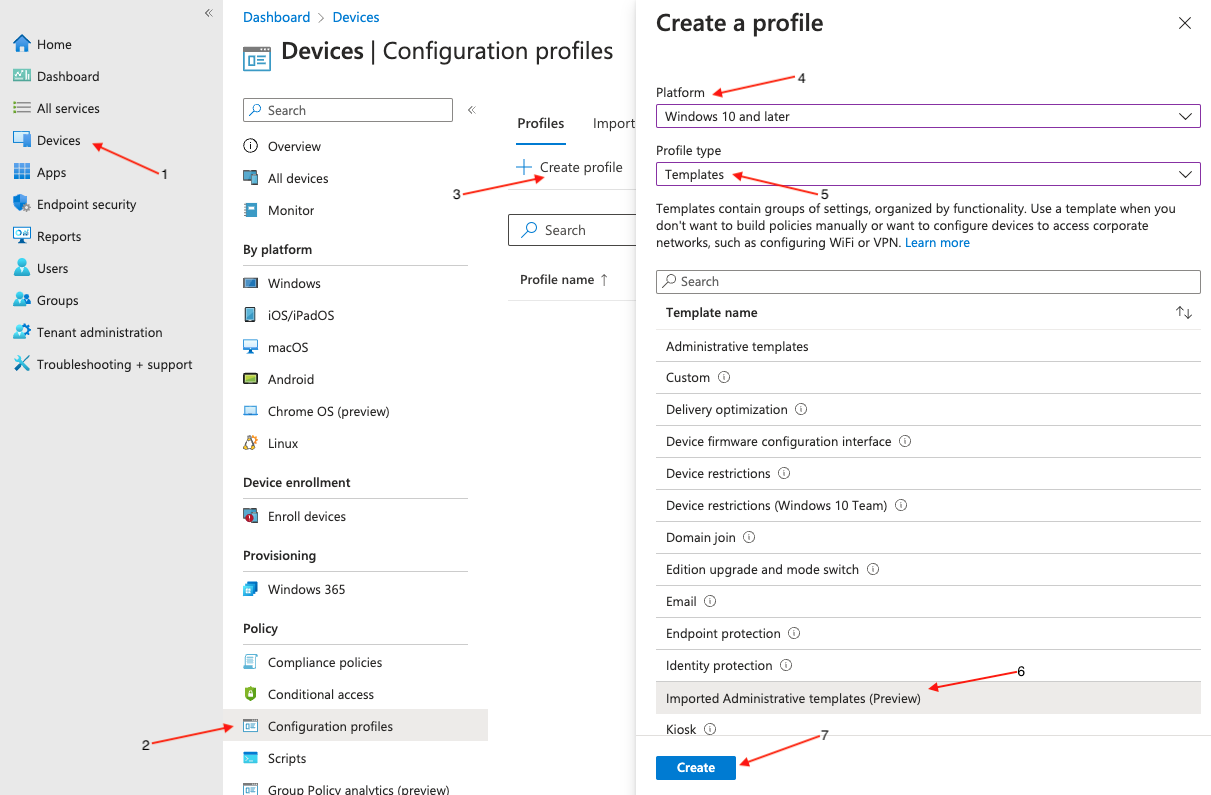
In Microsoft Endpoint Manager, select Devices (1) > Configuration profiles (2) > Create profile (3).
Select Windows 10 and later (4) as your target platform and Templates (5) as the Profile type. Then select Imported Administrative Templates (Preview) (6) then click the Create (7) button.
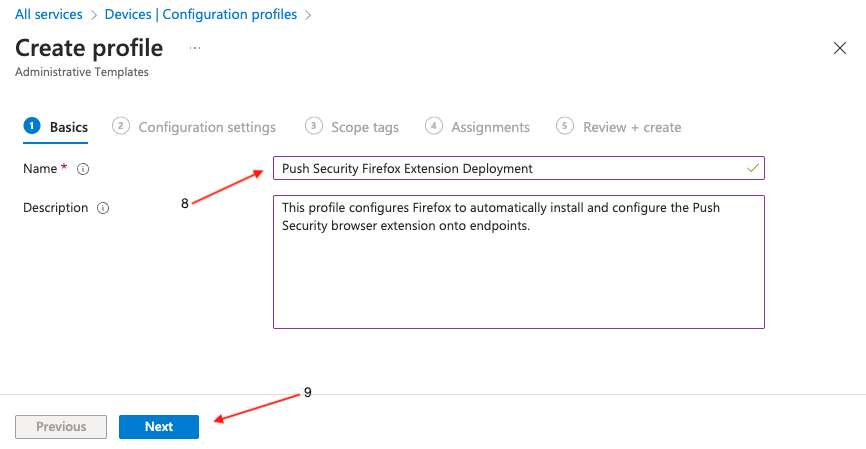
Enter a descriptive name for the profile (8), and a description if required, then click Next (9).
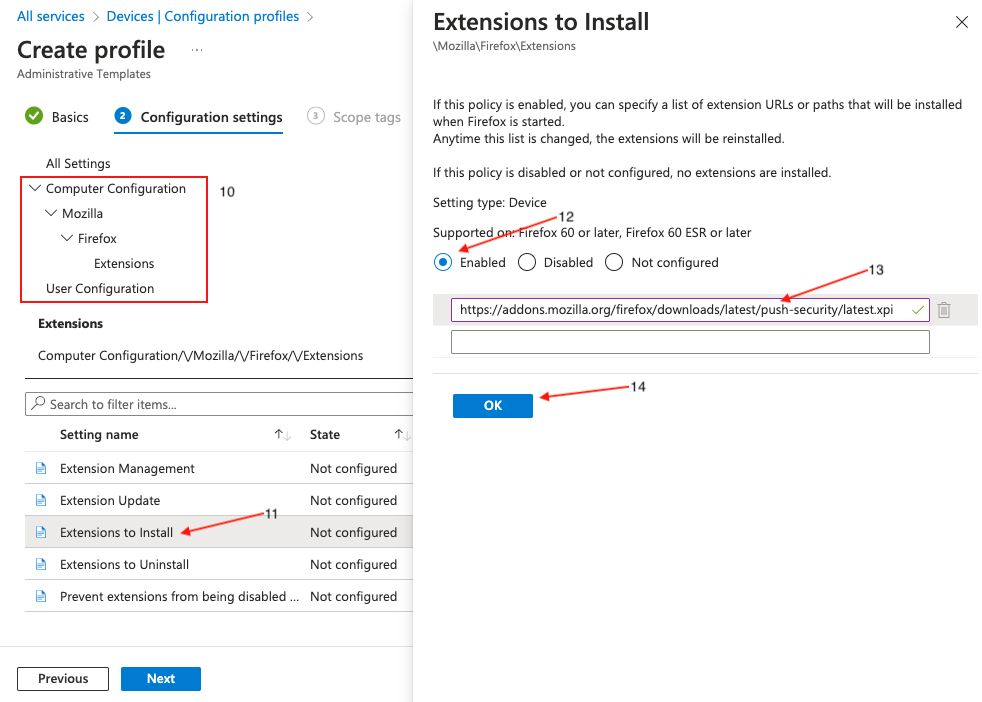
On the next screen, make sure Computer Configuration is selected (10).
Note: If you prefer to deploy the policies as user-scoped, you can do so by configuring the policies under User Configuration instead.
In the Setting name listing, click on Mozilla, then Firefox, then Extensions, and finally Extensions to Install (11).
When a page opens on the right side of your screen, scroll down, click the Enabled radio button (12), and paste the following string into the value field (13):
https://addons.mozilla.org/firefox/downloads/latest/push-security/latest.xpiFinally, click OK (14).
Click Next at the bottom of the page and set any scope tags you require.
On the following page, assign target groups (15), or set it to apply to all users and groups, if required. Click Next (16).
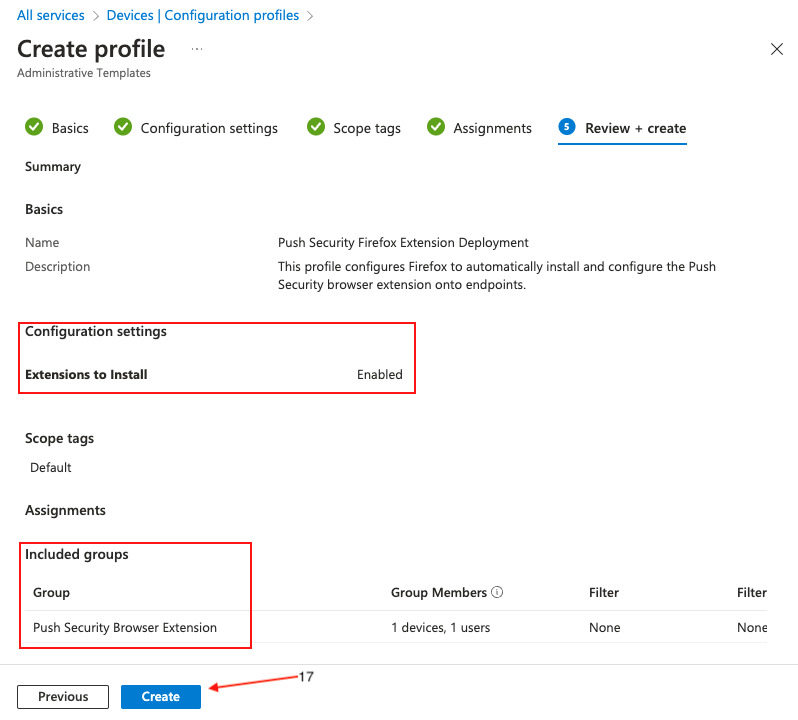
On the final page, review the profile for any errors and finally click Create (17).
Create a PowerShell script
A few settings can't be configured via configuration profiles, so you'll need to create a PowerShell script that will run on each endpoint in order to finalize the configuration.
The script will create registry keys and values containing policy settings for the Push browser extension. It is not possible to create those values using administrative templates in Intune.
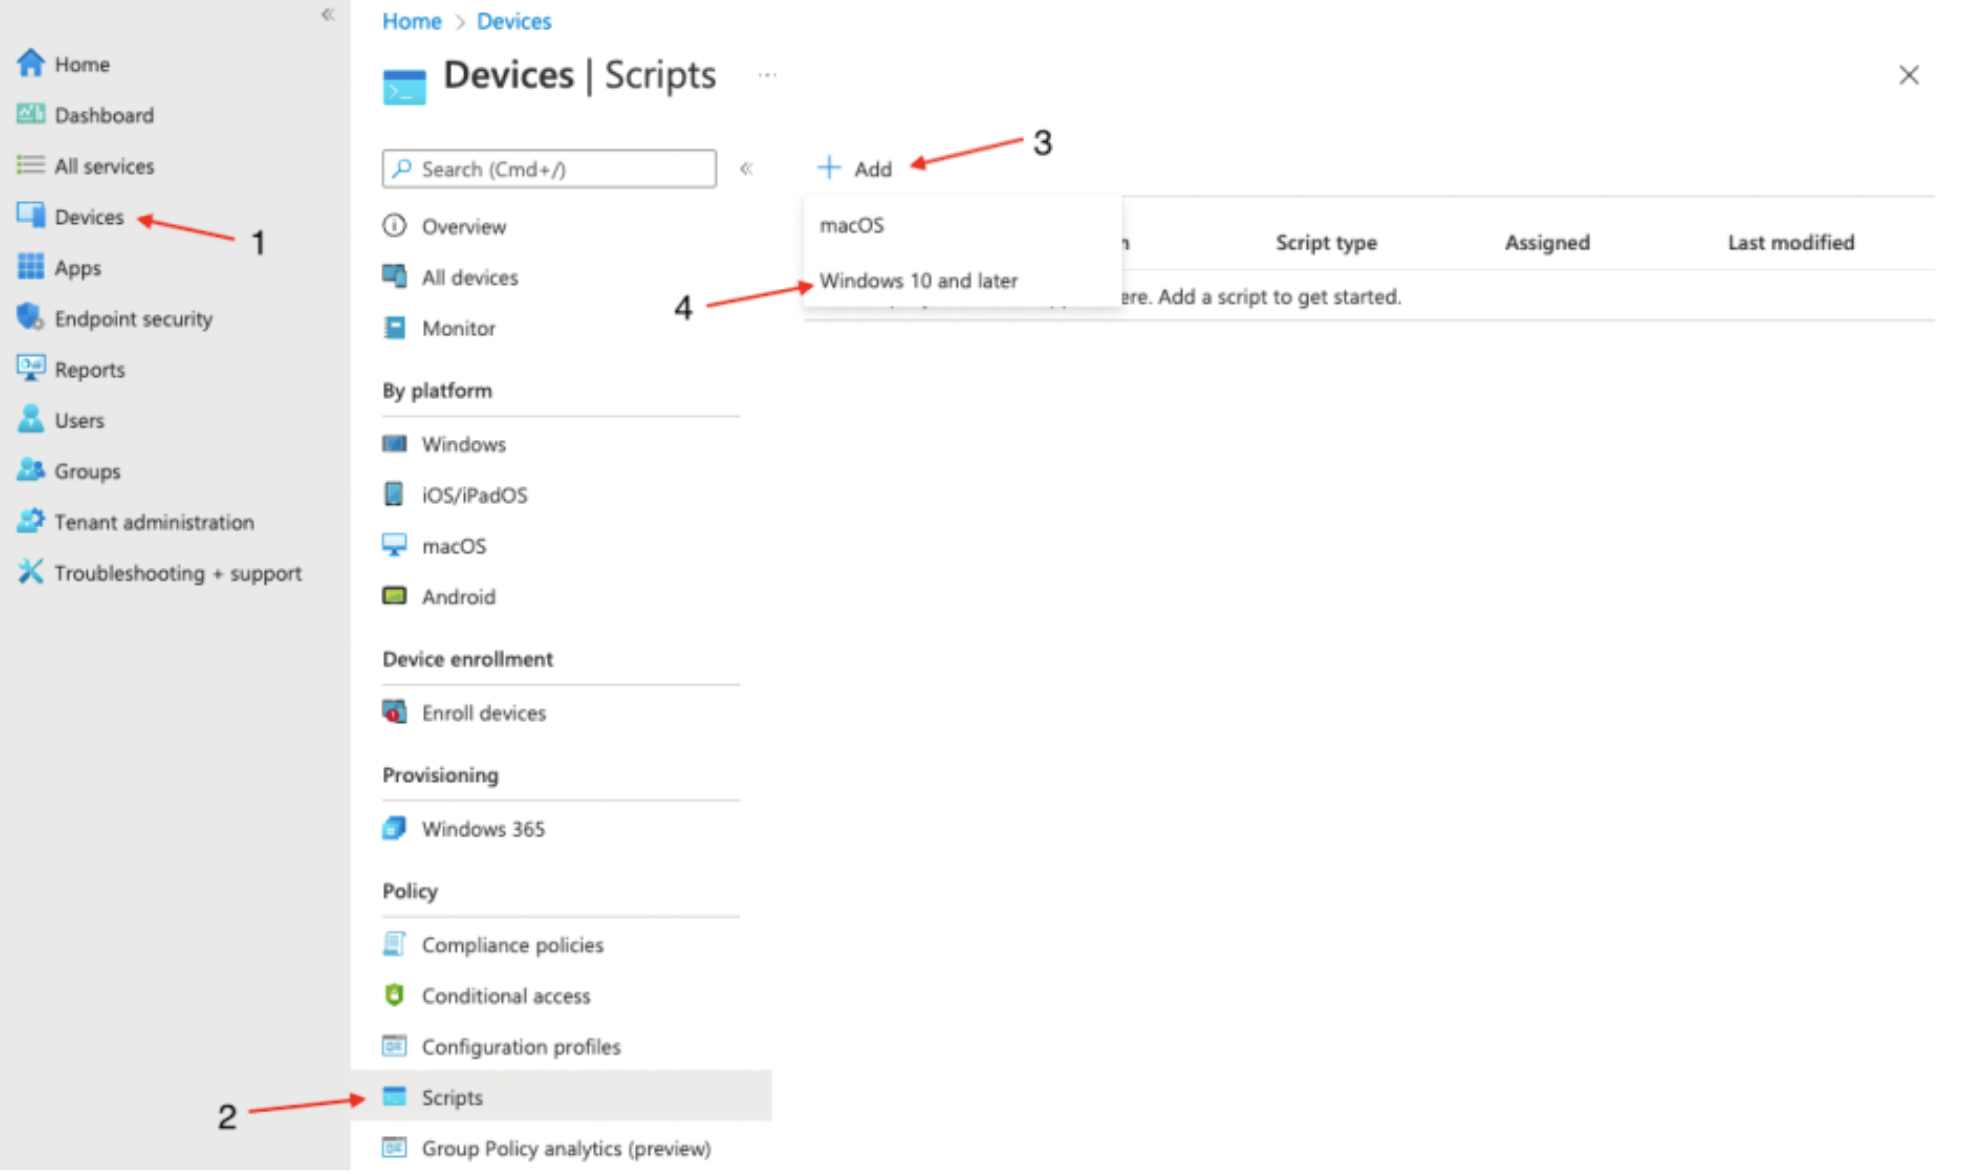
In Microsoft Endpoint Manager, click on Devices (1) > Scripts (2) > Add (3), and then from the dropdown menu, select Windows 10 and later (4).
On the Add PowerShell script screen, provide a Name (5) for the script and an optional description. Then click Next (6).

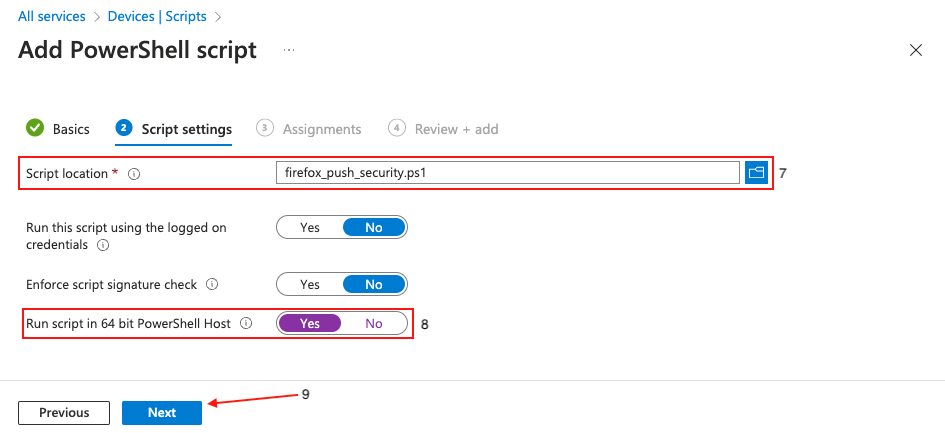
Next, upload firefox_push_security.ps1 (7). This is included in the config.zip file you generated in the Push admin console.
Once uploaded, locate the option Run script in 64 bit PowerShell Host (8) and click Yes. This is an important step to make sure that the registry keys are created in the correct location on 64-bit hosts. Click Next (9).
Click Add groups (10) to specify the group or groups you wish to deploy the settings to, or set it to apply to all users and groups. Click Next (11).
On the final page, review the profile for any errors and finally click Create (12).
Deploying to Brave
Generate the extension config
The first step is to generate a config file in the Push admin console. Skip to the next step if you've already done this.
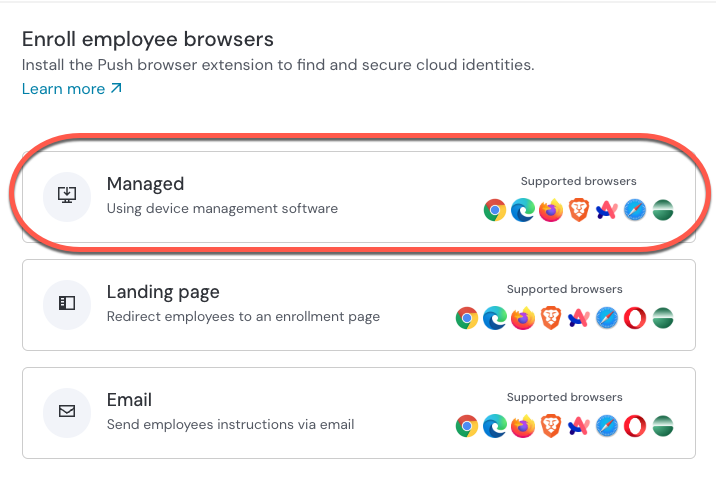
In the Push admin console, go to Browsers > Enrollment options.
Select the Managed enrollment option.
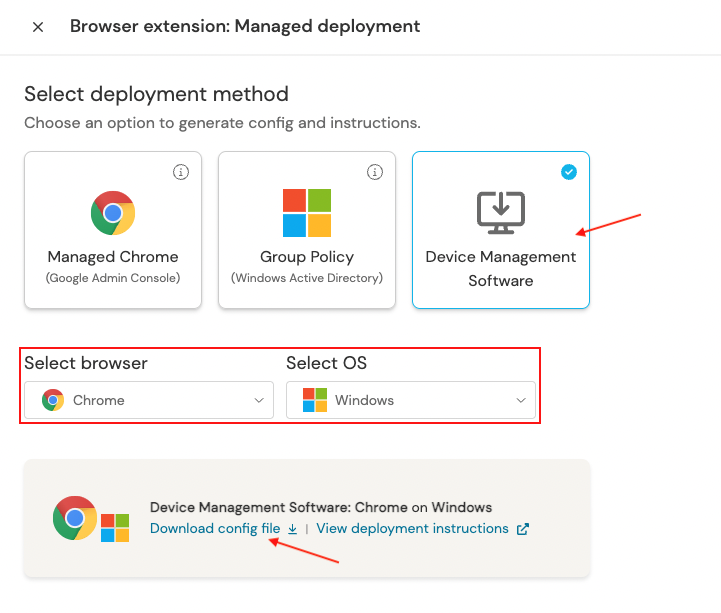
Select Device Management Software, choose Brave as the browser, and Windows as the OS. Then select Generate config. This downloads a config file specific to your team and contains some required ADMX templates.
Download and extract the zip file.
Import the Brave ADMX templates
Intune includes ADMX templates for Google Chrome and Microsoft Edge by default. However, for Brave, we’ll need to import the templates before we can apply any of the deployment settings.
1. To begin, get the required files from Brave. Download the policy_templates.zip file.
2. Extract the policy files. Remember the location of these files as you'll be importing them into Intune in the following steps.
Note: At the time of writing, importing the Brave ADMX files results in an error. To resolve this, we included a few files that you need to import prior to importing the Brave policy files downloaded in step 1.
4. In Microsoft Endpoint Manager, select Devices (1) > Configuration (2) > Import ADMX (3) > Import (4).
5. Import the ADMX templates. This is a two-part process because you first need to import the files you extracted following the generation of the Push app config, then import the Brave ADMX templates.
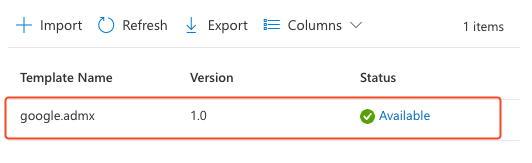
First, click on the ADMX file selector and browse to the location where the files from Push were saved. Select and import google.admx.
Next, in the ADML file selector, locate and import google.adml.
Finally, click Next.
On the next screen, select Create.
Important! Wait for Intune to finish importing the template, or you may get an error.
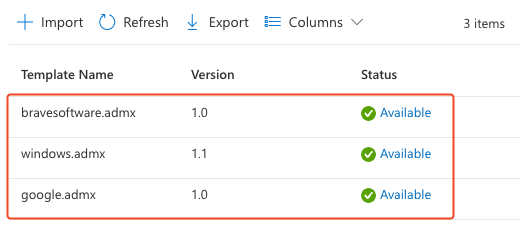
Next, repeat the previous steps for the remaining templates. You must import the templates in this order, one step at a time:
1. google.admx and google.adml
2. bravesoftware.admx and bravesoftware.adml
3. windows.admx and windows.adml
Wait for each template import to complete before proceeding with the next one. Your imported templates page should resemble the following screenshot.
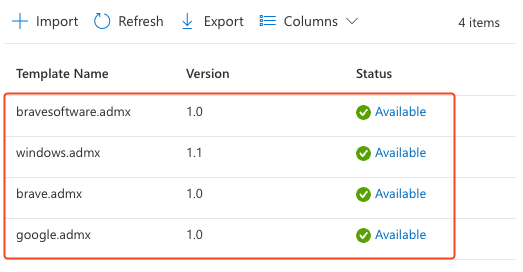
Once all three templates have successfully been imported, you can proceed with the Brave policy files. These are located in the folder containing the extracted policy_templates.zip file from step 1. The files are located at windows\admx\brave.admx and windows\admx\en-US\brave.adml respectively.
Once complete, the page should show that all four templates have been successfully imported.
Create a configuration profile
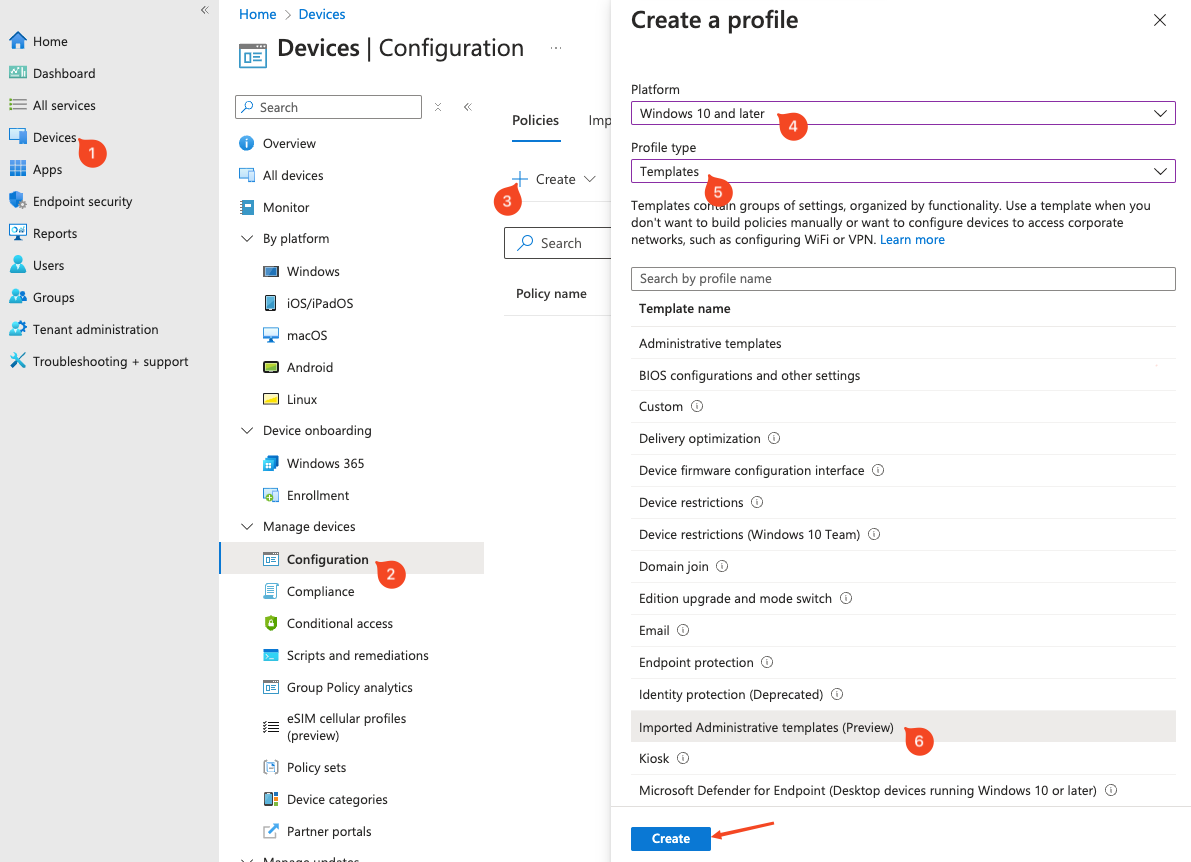
In Microsoft Intune, select Devices (1) > Configuration (2) > Create (3).
Select Windows 10 and later (4) as your target platform and Templates (5) as the Profile type. Then select Imported Administrative templates (6) and click the Create button.
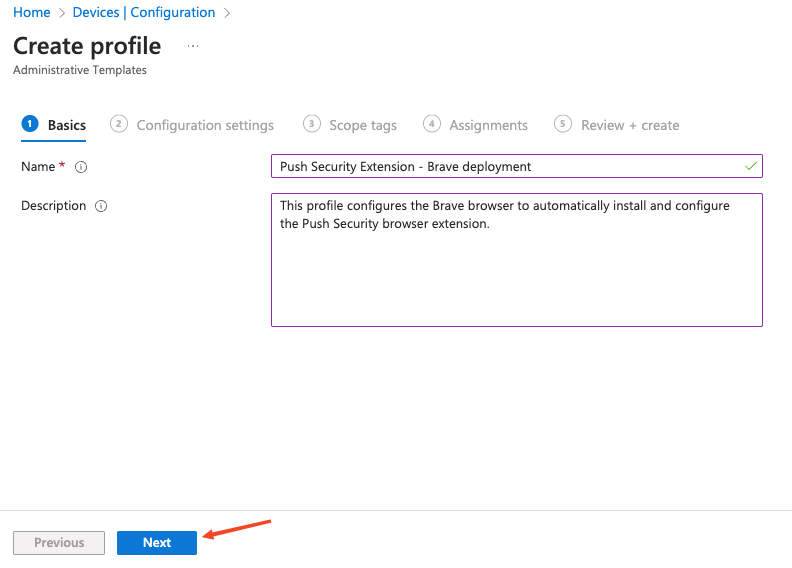
Enter a descriptive name for the profile and a description if required, then click Next.
On the next screen, select Computer Configuration.
Note: If you prefer to deploy the policies as user-scoped, you can do so by configuring the policies under User Configuration instead.
In the Setting name list, go to Brave > Brave > Extensions > Configure the list of force-installed apps and extensions. If a page opens on the right side of your screen, scroll down, click the Enabled radio button, and paste the following string into the value field:
dljjddkmmcminffjbcmeccgfbjlhmhlm;https://clients2.google.com/service/update2/crxThen select OK.
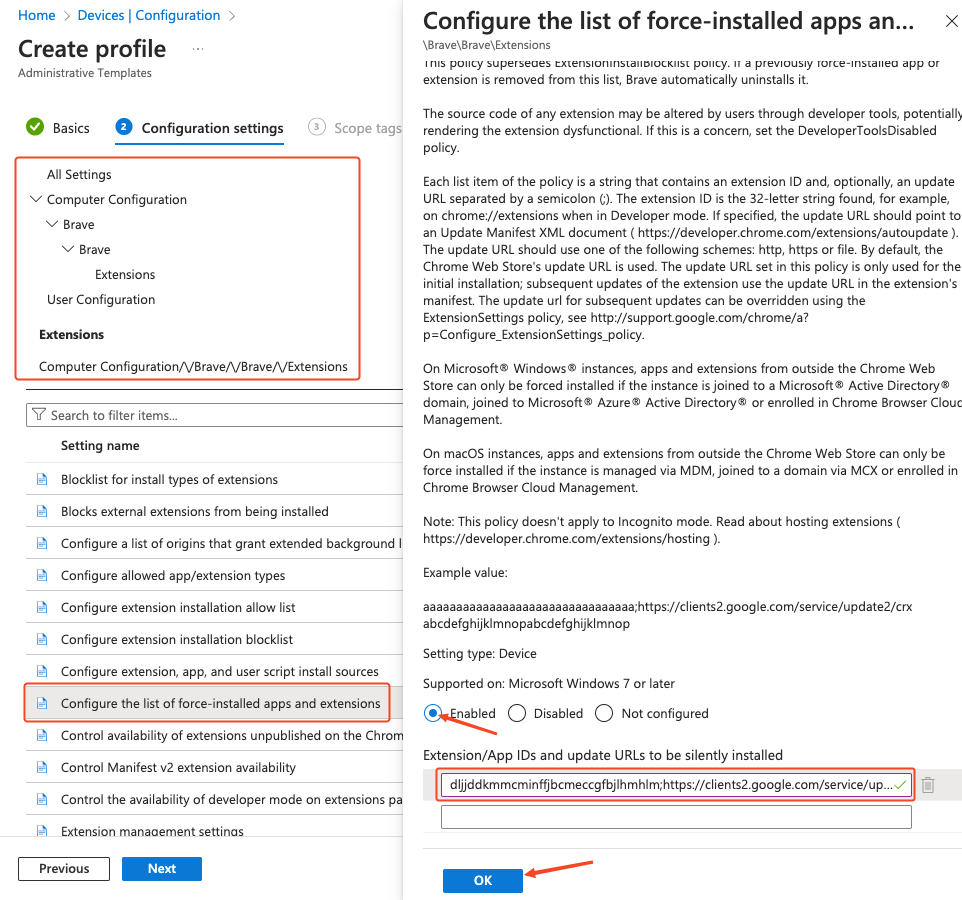
Note: The URL following the extension is one associated with Google Chrome. This is intentional and should be configured as defined in this documentation for the extension to be successfully rolled out to Brave browsers.
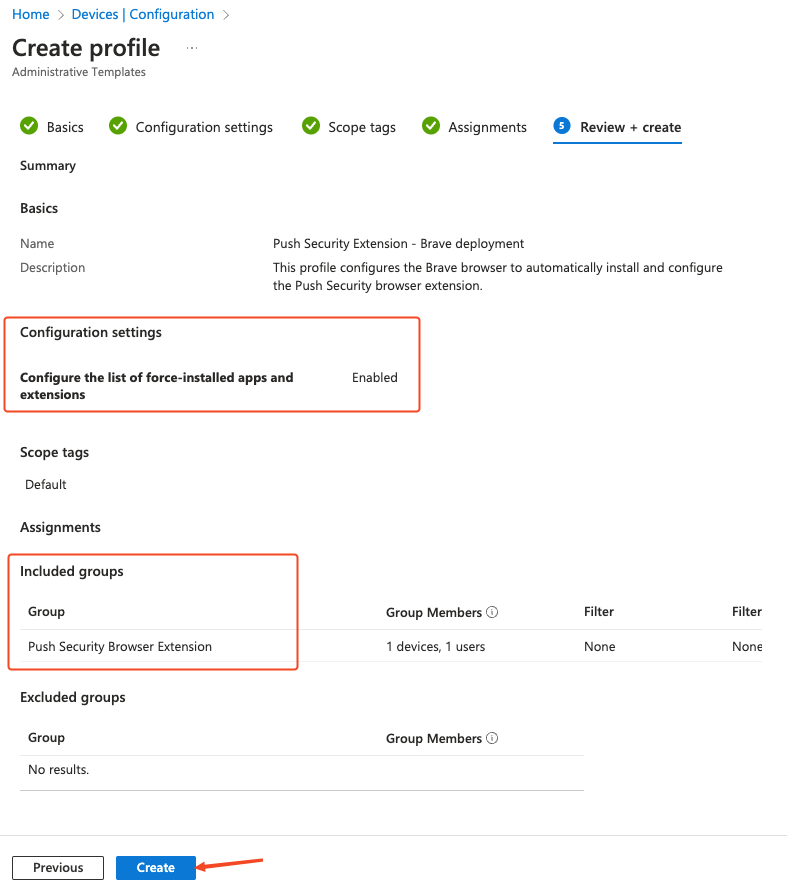
Click Next at the bottom of the page and set any scope tags you require.
On the following page, assign target groups, or set it to apply to all users and groups, if required. Click Next.
On the final page, review the profile for any errors and click Create.
Create a PowerShell script
A few settings can't be configured via configuration profiles, so you'll need to create a PowerShell script that will run on each endpoint to finalize the configuration.
The script will create registry keys and values containing policy settings for the Push browser extension. It is not possible to create those values using administrative templates in Intune.
In Microsoft Intune, click on Devices (1) > Scripts and remediations (2) > Platform scripts (3) > Add (4).
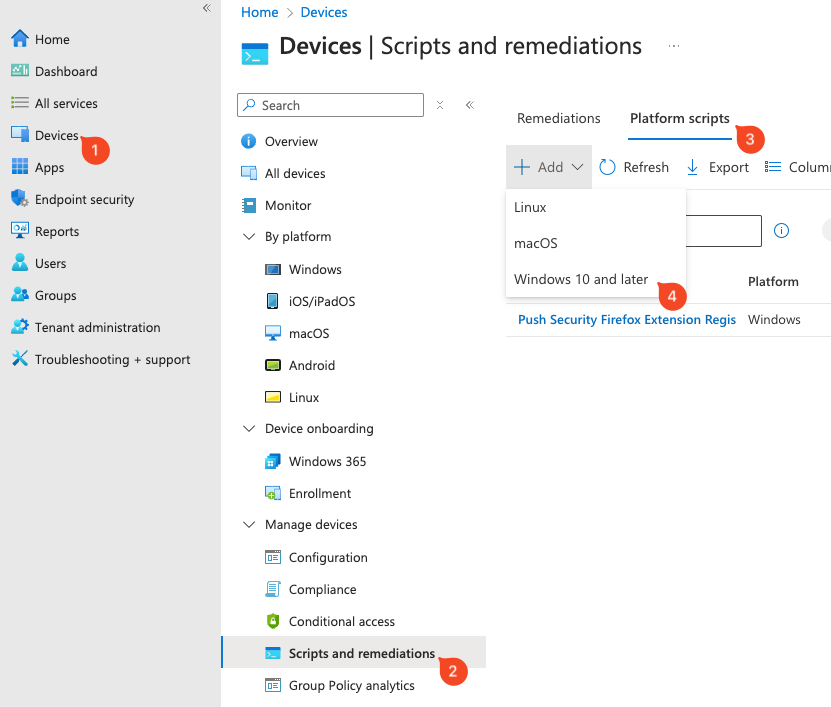
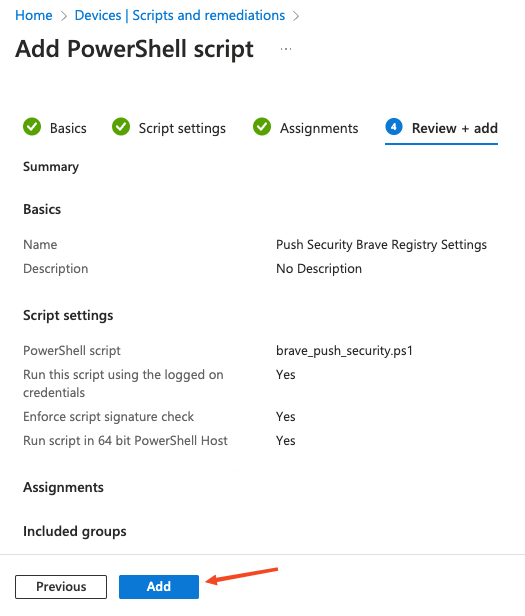
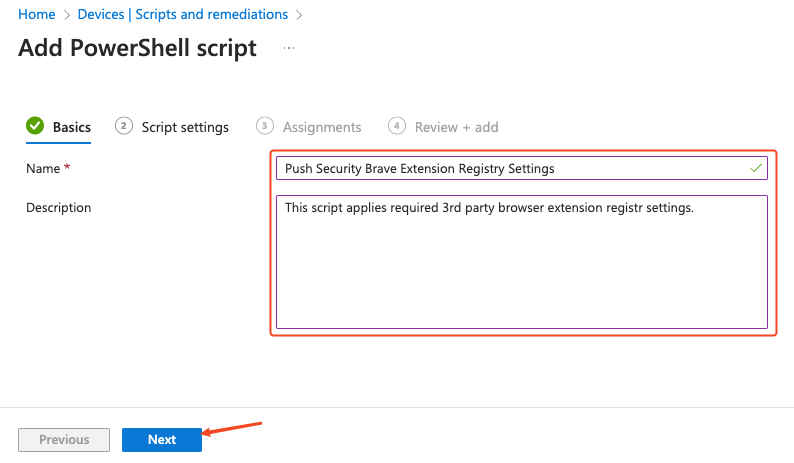
On the Add PowerShell script screen, provide a Name for the script and an optional description. Then click Next.
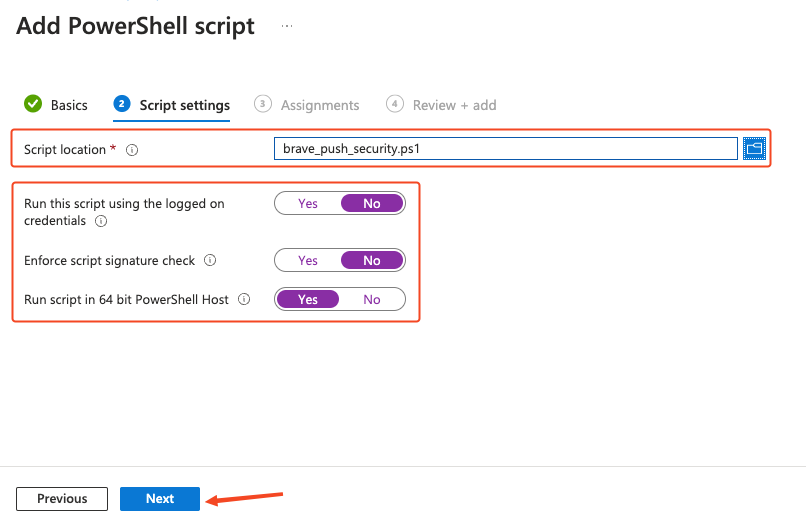
Next, upload brave_push_security.ps1. This is included in the config file downloaded from the Push admin console.
Once uploaded, ensure that the Run this script using the logged on credentials and Enforce script signature check options are set to No, and set Run script in 64 bit PowerShell Host to Yes. This is necessary to make sure that the registry keys are created in the correct location on 64-bit hosts. Click Next.
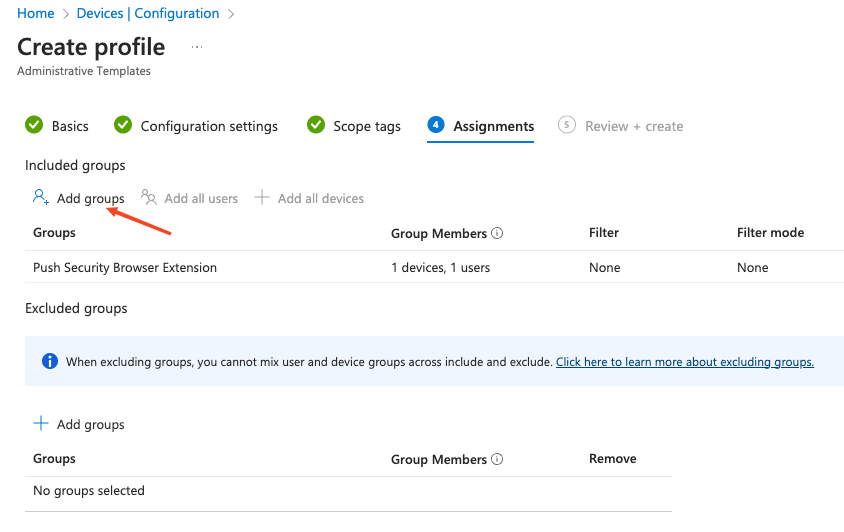
Click Add groups to specify the group or groups you wish to deploy the settings to, or set it to apply to all users and groups if required. Click Next.
On the final page, review the profile for any errors and finally click Add.